11 Budget Ways to Upgrade Your Basic Frameless Bathroom Mirror
SaveComments
We independently select these products—if you buy from one of our links, we may earn a commission.
(Image credit: Lana Kenney)
Ah, the classic, frameless, builder grade mirror. It's one of your biggest bathroom features, and also one of the least special. Here's the good news. If you have one of these very common mirrors, there are tons of ways you can upgrade them on a budget.
The quintessential budget way is to frame what you already have, using either wooden boards or inexpensive molding, depending on the look you want. Young House Love demonstrates how to frame around a clip-on mirror for roughly $14 using basic pine. You can also use molding strips in the same fashion, for a more intricate border.
(Image credit: Blesser House)
Once the basic frame is up, you can go a step further with paint. Above, Lauren of a Blesser House dry brushed black mineral paint to give her formerly white mirror a little contrast, which added a nice depth and texture.
Like the idea of a pattern instead? Take inspiration from this West Elm mirror and add a herringbone design on the edges of your frame. The simple, geometric shapes give high impact on a small budget. (Or use a stencil for more intricate patterns like bone inlay.)
(Image credit: Studio McGee)
If you want something a little more minimalist, get the look of these master bathroom, designed by Studio McGee, by gluing metal brackets to the four corners of a basic frameless mirror. It's just enough detail to make them special, without a ton of work.
If you want to play up the rustic feel, aim for something like this mirror with black hardware and weathered wood mirror from Amazon. Christina made a DIY version for her modern farmhouse bathroom. The matching hardware and light fixtures really pull the space together.
(Image credit: Heather Keeling)
Kelly makes her mirror frame pull double duty as a display by turning her frame out. This is a great idea if you lack counter space!
(Image credit: Woodshop Diaries)
Shara from Woodshop Diaries had initially wanted to make a round frame for her mirror, but accidentally cut her board too thin. Instead of starting over, she turned her accident into a design feature and made this 'sunrise' design. Installing a shelf over the mirror can break up a mirror that is too large for a space or provide warm contrast against cool glass.
(Image credit: Lana Kenney)
You can also frame your mirror without a frame! Lei and Dijon tiled from the vanity top to the base of the mirror for an interesting vignette. Tiling such a small area is easy on the wallet but looks like a million bucks.
(Image credit: Sarita Relis Photography)
Add a thin, low-profile shelf directly below the mirror. This one piece not only acts as additional storage, but also anchors the glass and makes the entire bathroom feel more custom.
Moving away from wooden frames, you could decorate your mirror directly. Using gilded mirrors from Anthropologie as inspiration, Kasie found a way to DIY the look herself. Personally, I like hers better than the originals.
(Image credit: A Beautiful Mess)
Another gem of a project: Laura from A Beautiful Mess makes a pattern with vinyl over her mirror and sprays with gold paint to create these crisp lines. Use a paint pen if you want a less permanent solution: it'll wipe right off when you change your mind.
Cat Meschia
Contributor
I'm Cat, a 20-something creative associate currently based in Florida.
Distinctive styling and elegant lines come together to form a complete range of modern classics in the Sheffield Bathroom Vanity collection. Inspired by well established American standards and crafted without compromise, these vanities are designed to complement any decor, from traditional to minimalist modern.
Available in multiple sizes and finishes.
The Wyndham Collection is an entirely unique and innovative bath line. Sure to inspire imitators, the original Wyndham Collection sets new standards for design and construction.
Features
Constructed of environmentally friendly, zero emissions solid wood, engineered to prevent warping and last a lifetime
12-stage wood preparation, sanding, painting and finishing process
Highly water-resistant low V.O.C. sealed finish
Beautiful transitional styling that Complements any bathroom
Counter options include Ivory Marble, White Carrara Marble, Carrara Cultured Marble, and White Cultured Marble
Counter includes 3" backsplash
Backsplash comes in two pieces due to high probability of breakage (cut from one single piece)
Available with Porcelain undermount sink(s)
Oval sink(s) available with pre-drilled 8" Widespread 3-Hole faucet mounts
Square sink(s) available with pre-drilled Single-Hole faucet mounts. Additional holes may be drilled by customer on site.
Faucet(s) not included
Matching mirror(s) optional
Metal exterior hardware with brushed chrome finish
Four (4) functional doors
Five (5) functional drawers
Plenty of storage space
Due to variations in natural stone, your counter may differ from the picture
Plenty of counter space
How to handle your counter
Spec Sheet for Vanity
Spec Sheet for Cultured Counter
Spec Sheet for 24" Mirror
Spec Sheet for 70" Mirror
Spec Sheet for Medicine Cabinet
Spec Sheet for Linen Tower
Installation Guide
Installation Guide for Medicine Cabinet
Natural stone like marble and granite, while otherwise durable, are vulnerable to staining from hair dye, ink, tea, coffee, oily materials such as hand cream or milk, and can be etched by acidic substances such as alcohol and soft drinks. Please protect your countertop and/or sink by avoiding contact with these substances. For more information, please review our "Marble & Granite Care" guide.
Sheffield Double Bathroom Vanity (80" Model), Drag to Rotate or Open
⚠WARNING: This product can expose you to chemicals, including wood dust and methanol, which are known to the State of California to cause cancer, birth defects or other reproductive harm. For more information, go to: www.P65Warnings.ca.gov.
Are you thinking about remodeling your home? Or, are you ready to begin an extensive construction project to build the house of your dreams? Whether your project is big or small, you'll need a set of detailed plans to go by. In years past, you would have to shell out a significant amount of cash and pay an architect to perform this task. But, thanks to technology, you can now design house plans online. Here are a few digital tools that can make the process as easy as possible.
Planner 5D
This is a free online tool that allows you to create a generalized house design and plans while also enabling you to add intricate details like stairs. This is the tool you need if you're just starting out but want to create a comprehensive plan. Planner 5D is intuitive, user-friendly and a cinch to begin. It even takes the house-planning phase a step further and allows you to create a customized backyard space. You even get the opportunity to explore those garden design plans you keep putting off. Need some inspiration from others who have already walked in your shoes? Browse the online gallery to view user-created 3D renderings and visualizations to get ideas.
IKEA Home Planner Platform
If there's one brand name that's synonymous with modern design and sleek functionality, it's IKEA. This furniture and home goods company has changed the game with its DIY-based sets that are as cost-affordable as they are stylish. So, it comes as no surprise that the industry giant is adept at helping customers determine exactly how their new IKEA furniture will fit into their new home. As you create the floor plan, you might need to know how a new couch will fit into the living room or how the dining room should be configured to hold that farmhouse table you've had for years. The IKEA home planner tool can help you render a layout of your home, then drop these items in virtually for a quick glimpse into the future. From home bar design plans to the perfect nursery, you're limited only by your imagination — and the extensive IKEA catalog.
Roomstyler 3D Home Planner
Even if you choose to begin your design by selecting a standard template available on this software, the program features enough customization that you'll soon see your own ideas come to life. As you view your plan directly beside its corresponding 3D image, you can see in real time the effects of any changes you make. Wondering what the room looks like from another angle? No problem. With every space you create, you can move the images around to get a 360-degree view. One of the neatest parts of the Roomstyler platform is the fact that users can select real products to place inside their homes. This provides a clearer view of what your home will really look once it's completed.
Magic Plan
Are you itching to create a floor plan from scratch but lack the professional expertise to put together real, to-scale drawings? Magic Plan does the legwork for you, allowing you to see a detailed rendering of your vision without requiring you to measure one square foot or draw a single dimension. Though in-app purchases are available, this app is available at no cost, meaning you can create design plans free of charge. You might not get the same level of detail out of Magic Plan that you can achieve with its peers, but for on-the-go updates and quick room modifications, it's one of the best options. This is only a sampling of the myriad online tools available to help you with your next home remodel. Feel free to browse around and find one that fits your specific needs. Then, start designing and making your dream home a reality.
Trying to work out what a bathroom renovation costs? You are not alone. Price is one of the biggest factors in any home modernisation project.
The great news is that there is no reason why bathroom renovation costs need to get out of control. There are plenty of ways to get your dream bathroom without spending a fortune and if you are trying to achieve a new bathroom on a budget you are in exactly the right place.
Our bathroom renovation cost guide breaks down each element of bathroom design so that you can see what is involved and how much it will set you back.
The cost of your bathroom renovation will depend on a number of factors, including:
The size of your bathroom
The amount of renovation work needed
The quality of finish you want
The spec of materials you choose
How much DIY you are willing to take on
The plumbing system you already have in place
Whether or not you will require a new boiler
Even with these variables to bear in mind, it is still possible to give an estimate of the kind if bathroom renovation costs you can expect.
A basic new bathroom suite could start from as little as around £250. But this is just the start. You also need to factor in installation, tiling, heating, lighting and bathroom furniture.
According to Victoria Plum, the average cost of installing a new bathroom in the UK is £6,500. However, depending on the amount of work you are happy to do yourself, this could come much lower. Equally, larger spaces, those that need more renovation work and those that are using luxury products will see prices range from £7,000 - £15,000+.
These costs don't just include fitting new sanitaryware. They are also based on the installation of heating in the form of heated towel rails or underfloor heating, lighting, plastering and decoration, extraction units, furniture and shower trays and tiling too.
How Much Does it Cost to Fit a Bathroom?
When working out your bathroom renovation cost it is important to factor in fitting costs. Don't forget labour costs, tiles, heated towel warmers, lighting and frames for baths to be built in to.
As a starting point, a plumber should be able to carry out a simply like-for-like bathroom retrofit in two or three days, as well as removing the old one — this would cost around £1,000.
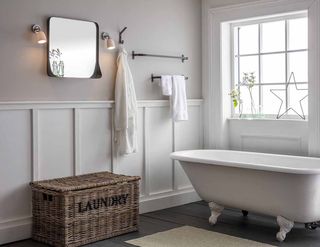
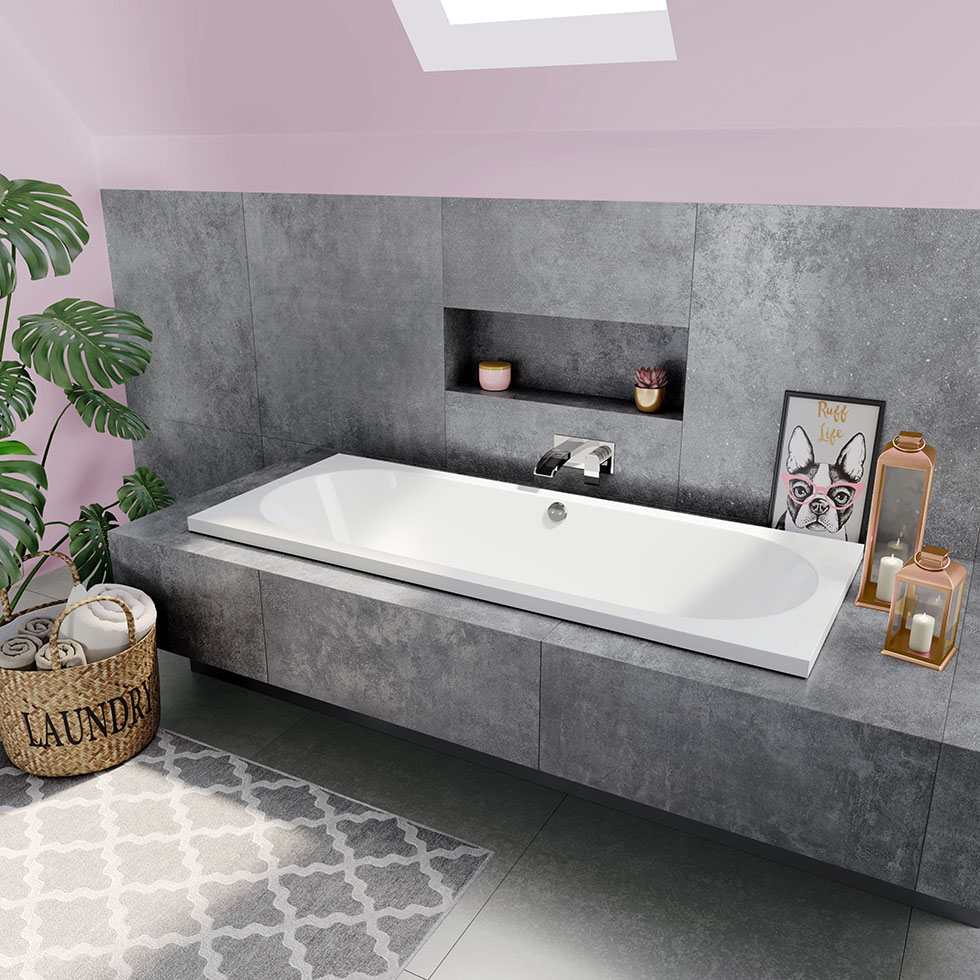
Bathroom renovation costs very much depend on the specification you go for. The York Double-Ended Bath from Bathroom Mountain costs £149.99.(Image credit: Bathroom Moutain)
How Much Does Bathroom Tiling Cost?
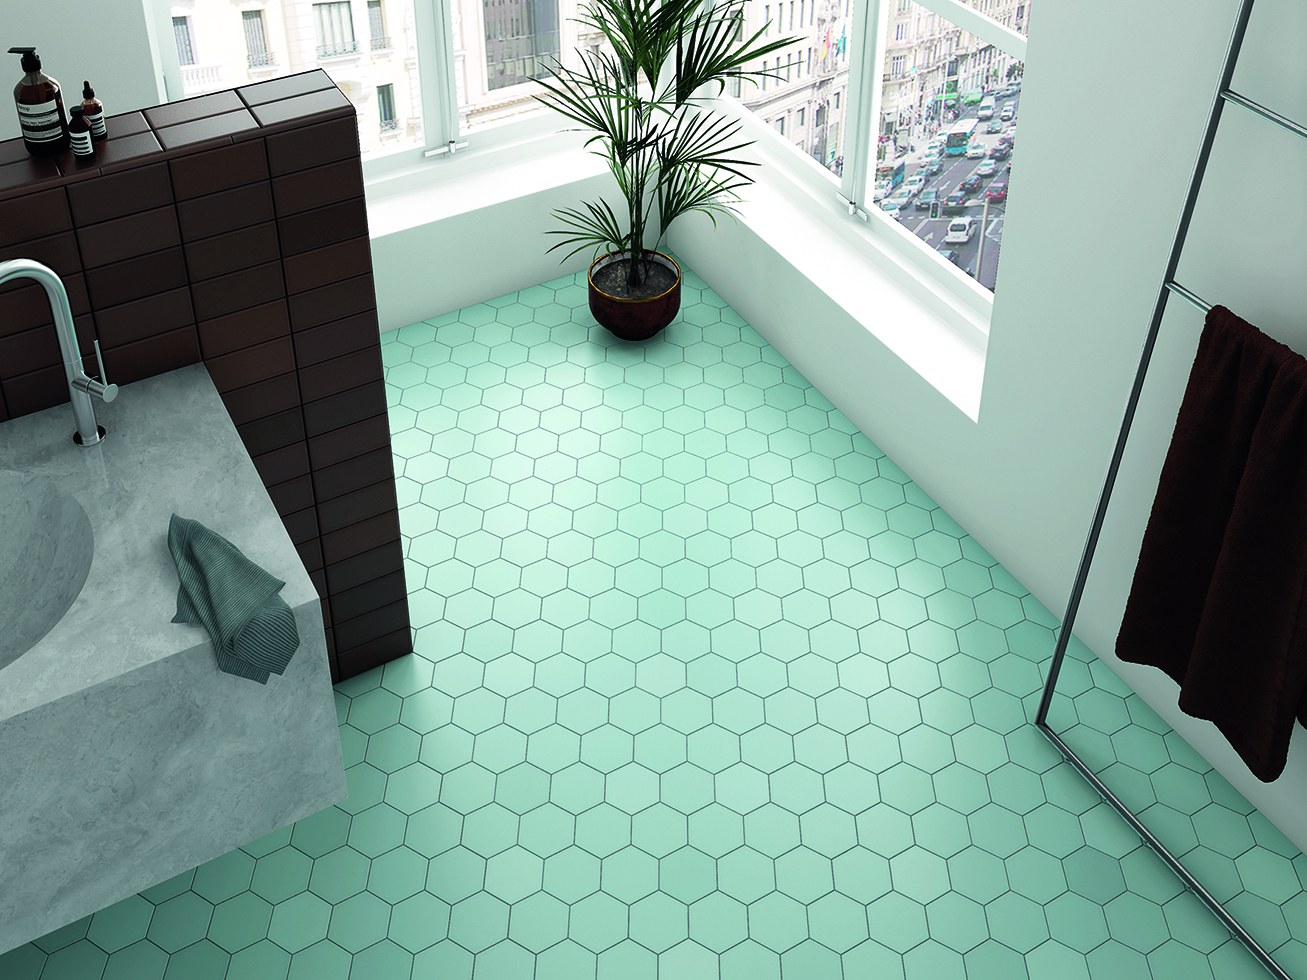
Kromatika Bleu Clair Tiles from Tile Mountain are made from porcelain with a matt finish and cost £39.95/m².(Image credit: Tile Mountain)
Prices to tile a bathroom fall at around £85/m². However, these prices will vary depending on the tiles you have chosen and the size of your bathroom.
Your bathroom flooring has to look good, suit your chosen fittings but also most importantly has to stand up to water, humidity and be slip resistant.
The types of materials you choose will also affect the cost - you can choose from vinyl, ceramic, stone, engineered wood and even concrete.
How Long Does it Take to Tile a Bathroom?
It is hard to pinpoint how long it takes to tile a bathroom, but the average is somewhere between one and five days. This will depend on how much of the room you are having tiled and the size of the room, as well as the tiles you have chosen.
How Much does a Bath Cost?
Low end: from £80
Average cost: from around £300 to £700
Top end: Anywhere between £800 and £3,000
Remember:
A standard bath size is 700 x 1700mm and this what most high street manufacturers will sell.
If you buy a bathroom suite it's worth remembering that baths tubs tend not to be included (usually this only includes the WC and basin) so a bath is likely to be something you will need to buy separately.
The cost of a bath will depends on the material it is made from and whether it is a standard size or a more unusual size.
The very cheapest baths are usually made fromthin acrylic and come ready to be built in to a frame, which can then be tiled or finished with a purpose-made bath panel which you will have to buy separately.
(MORE: Where to Find Cheap Bathroom Suite)
Cheap acrylic baths cost from around £80, but can be flimsy and easily crack, so do give them a thorough check before buying.
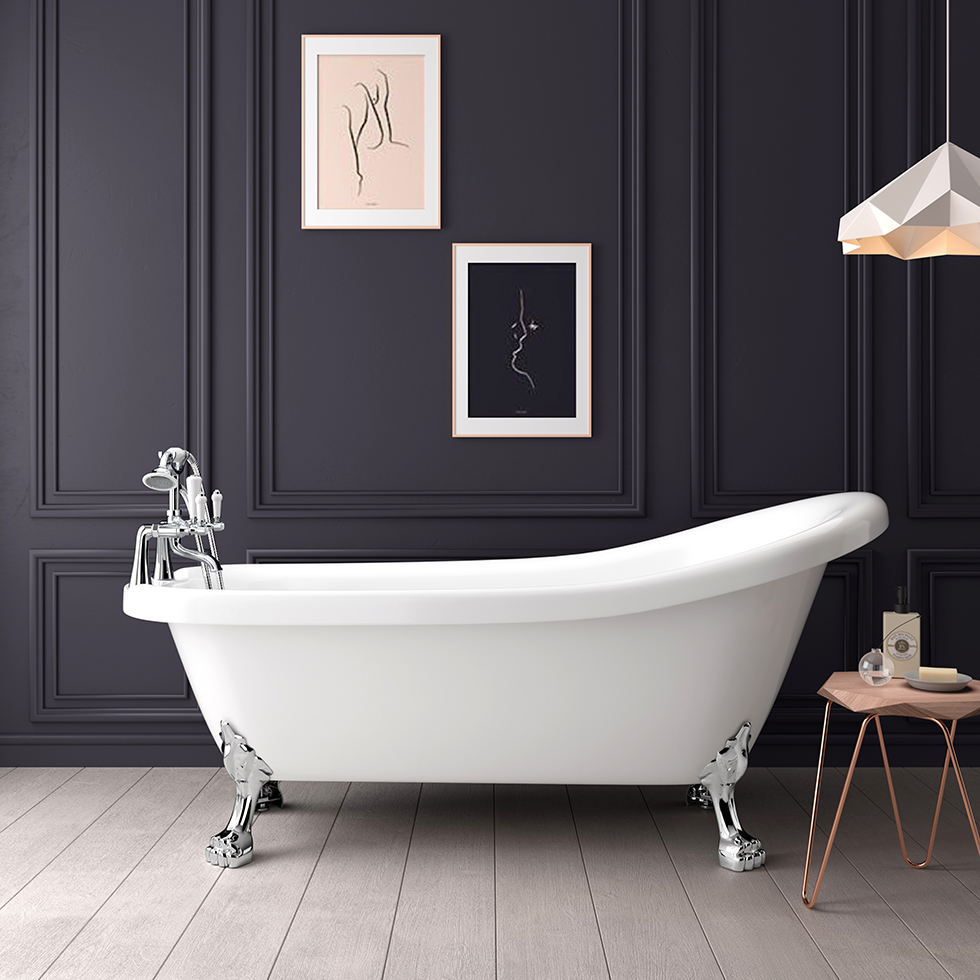
The Highbury Slipper Bath With Claw Feet from Bathroom Mountain costs £399.99.(Image credit: Bathroom Mountain)
Not all acrylics baths are cheap though and those made from thicker, fibreglass-reinforced acrylic are of a much better quality. Acrylic also keeps the water warm for longer than steel.
Steel baths are perfect for those on a budget who want durability without the hefty price tag. They tend to be more hardwearing than very low-cost acrylic baths and often cost little, if any, more — starting from around £120.
Once you start looking at cast iron, timber, composite and stone, the prices rocket. However, if you want to make a statement in the bathroom this is the way to go. Prices for these baths start from around £600, but can reach prices of up to £3,000.
How Much Does a New Shower Cost?
Low end: £50
Average cost: £60 – £500
Top end: £500 – £2,000+
If you want to know how to choose a shower, then first look to electric showers. These are the cheapest option and are ideal for those looking to carry out a quick, low cost bathroom update.
Electric showers have a connection to just the mains cold water supply and heat water on demand. This means that they struggle to reach the level of power provided by power showers and those using stored hot water, although choosing one with a higher kilowatt rating will help.
On the plus side, they are economic to run, installation is straightforward and they start at around £50.
Bath/shower mixers are another good option for those looking to keep their bathroom renovation costs low, with prices from £50.
(MORE: Family Bathroom Design Ideas)
The Absolute Titan Multi-Function Shower Head by Swadling Brassware is available from Matki. It has three spray settings and can be angled conveniently with the lever.(Image credit: Matki)
The shower hose and head are combined with the bath mixer tap and this is how the temperature is adjusted. They are easy and cheap to fit, but the pressure can be lacking and getting the water temperature right can be fiddly.
A manual shower mixer (from £60) has the hose and spray coming out from a wall unit, with a temperature control to adjust the temperature.
Thermostatic mixers are similar to manual mixers but have a built-in thermostat that automatically adjusts the water temperature (but not the pressure) if a tap elsewhere in the house is being used. They start at £125.
Power showers start at £150 and are connected to an integral pump to boost flow rate. However, they are not compatible with combi boilers as they need a supply from both a cold water cistern and a hot water cylinder.
These are just the basic shower types. Digital showers, shower towers, columns and cabins all offer a luxury showering experience, with a multitude of sprays and jets — at a cost of course, from £250 upwards.
Shower Enclosure Prices
Low end: from £100
Average cost: £120 – £300
Top end: £550+
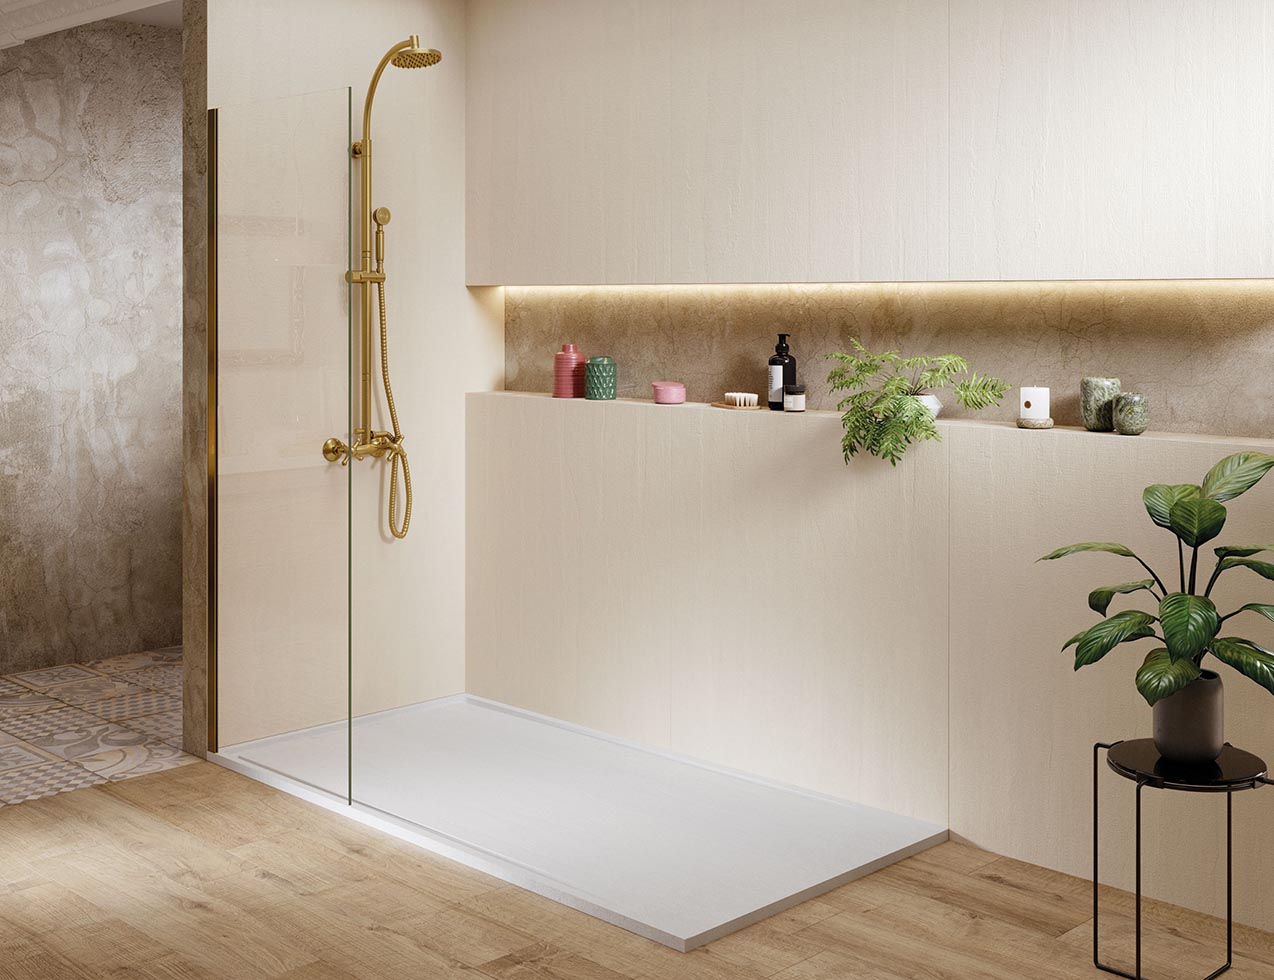
Acquabella's Tempo Arabba shower tray in white shown with Arabba wall panels in white. £650.(Image credit: Acquabella)
If you are in the process of shopping for shower enclosures you will have already realised that shower enclosure prices very much depend on configuration and materials.
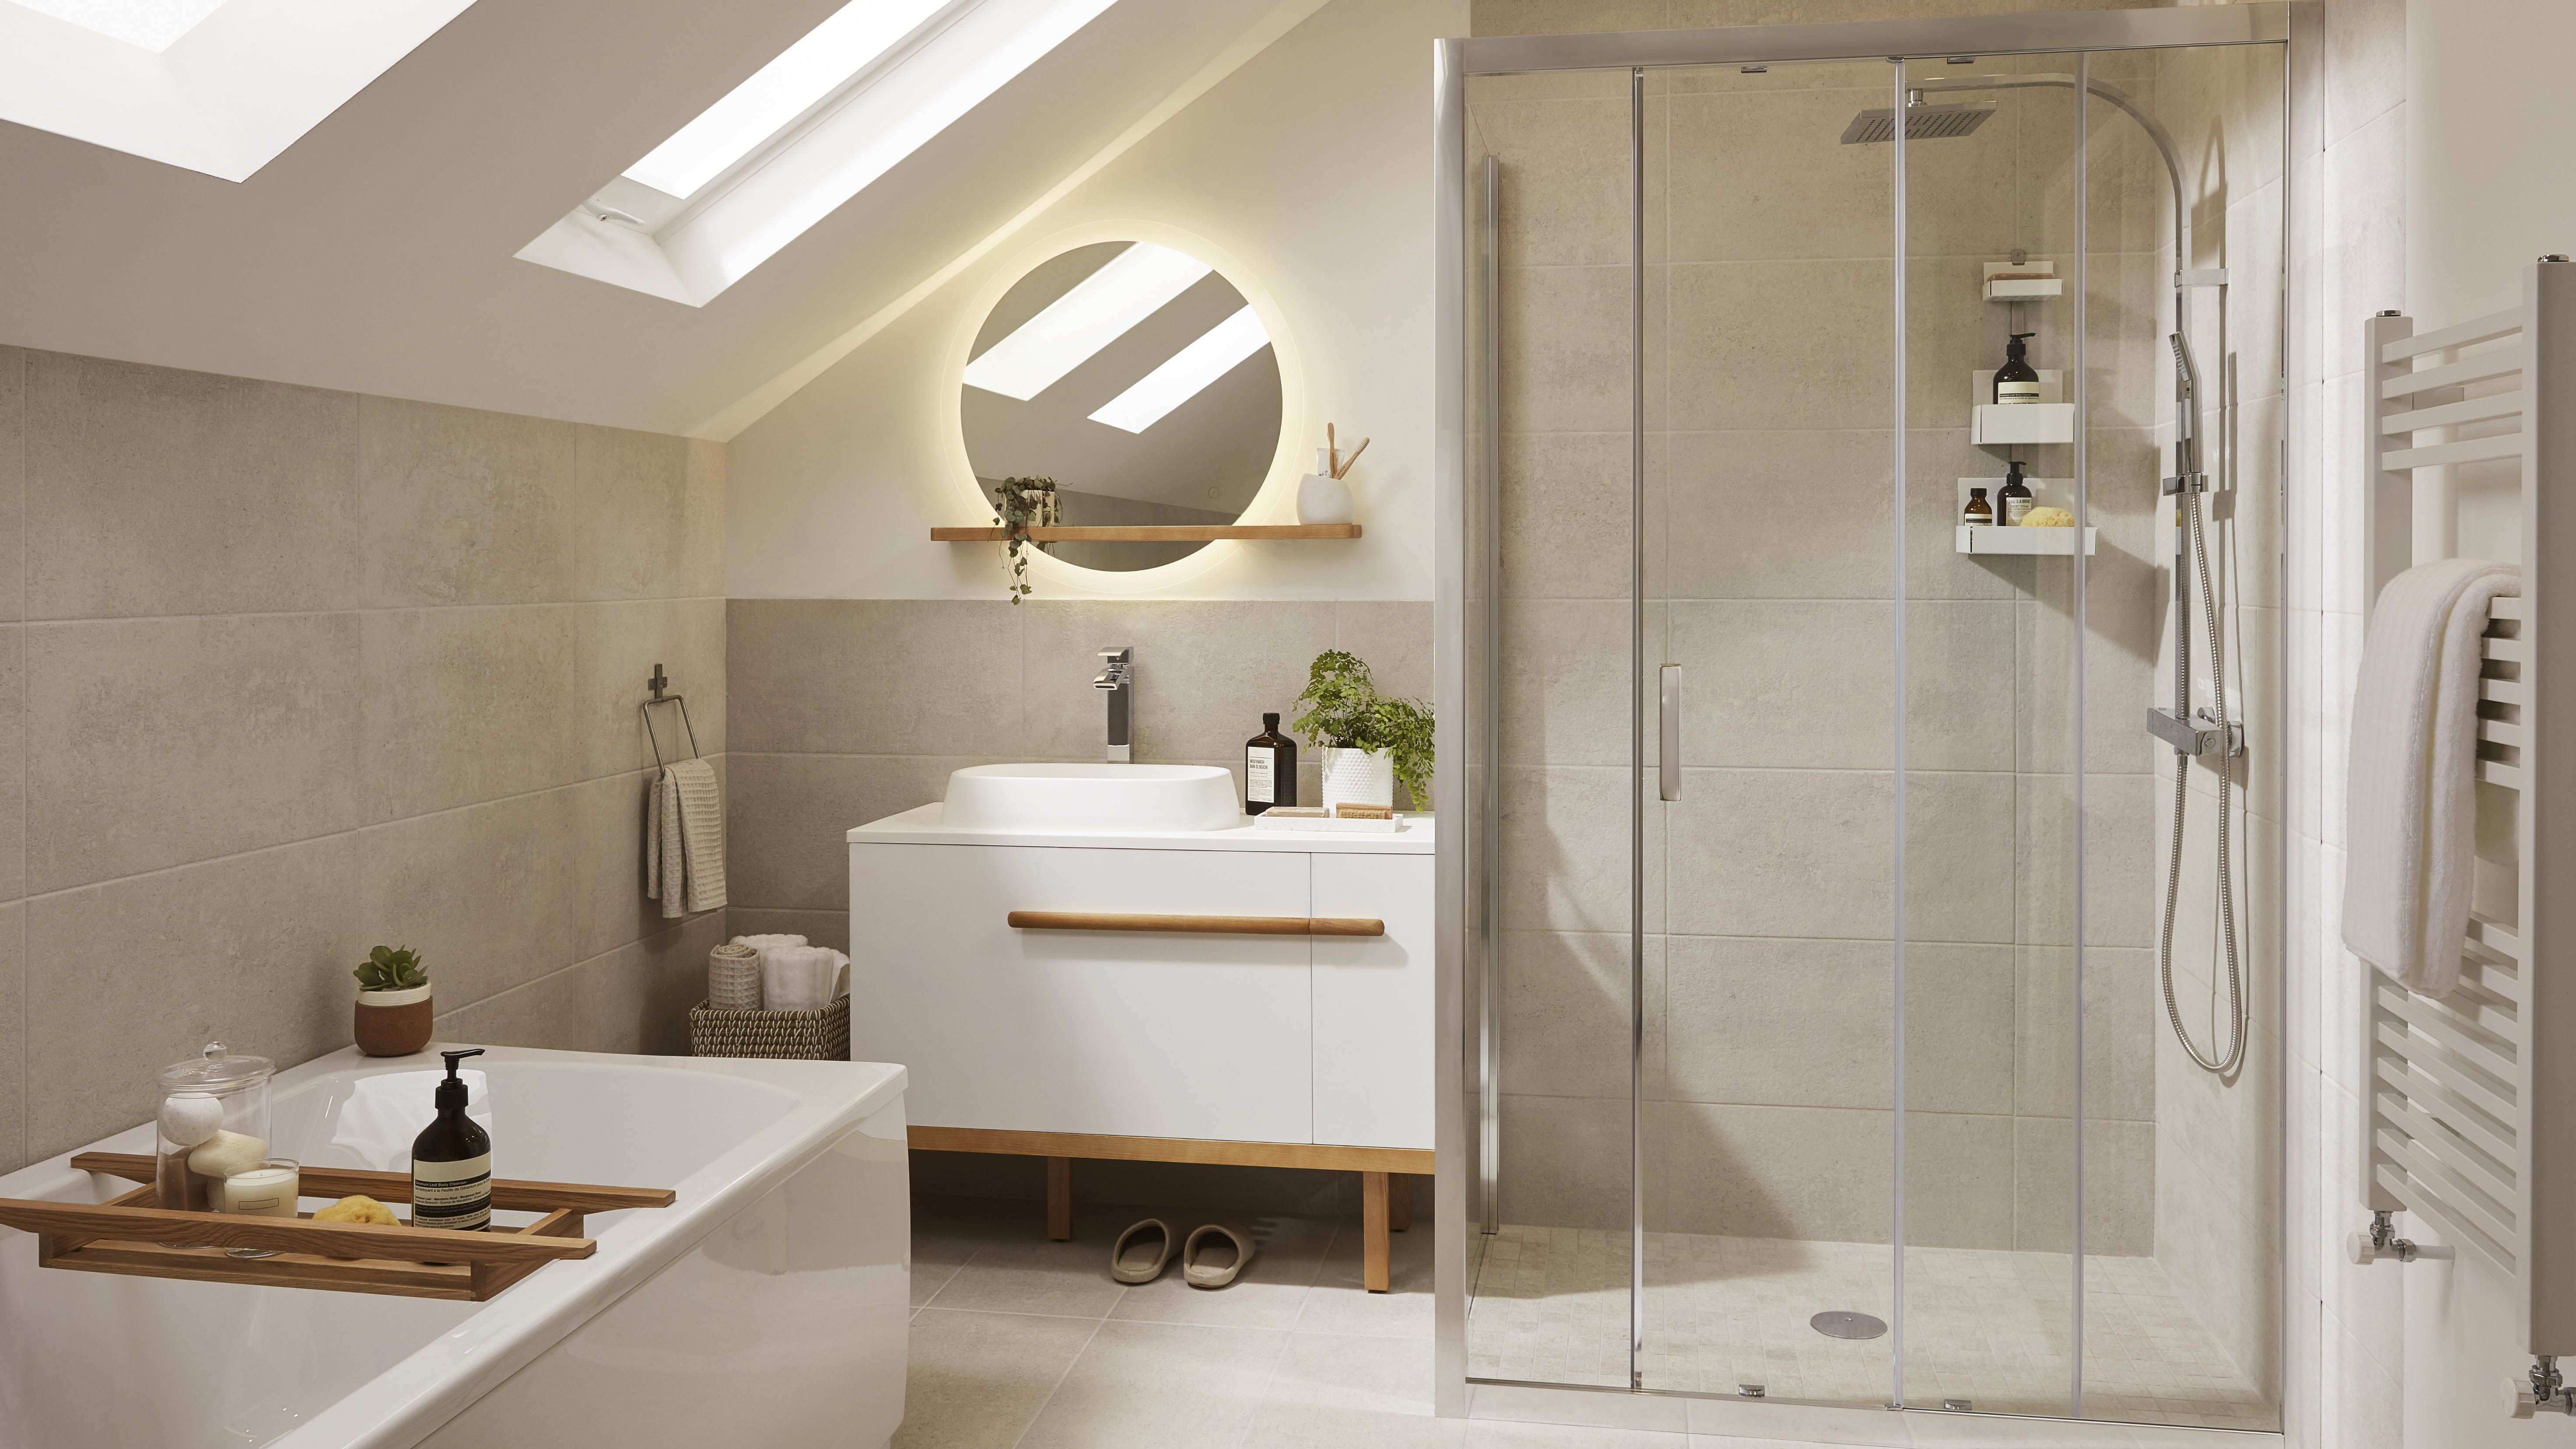
Basic shower enclosures featuring one glass side panel and a door, or a quadrant enclosure with double doors, can cost as little as £100.
GoodHome 'Ladoga' bathroom range from B&Q starts from £60.(Image credit: B&Q)
Don't forget, however, that you still need to factor in the cost of a shower tray, which will cost from £60 at the lowest end.
A complete 'wet room' style enclosure, complete with walk-in tray and frameless shower screen will cost from £550. A frameless fixed enclosure, with no door, will start at around £200.
Wet room kits can also be purchased. These come complete with everything you need to form a platform, drainage and waterproofing equipment (but excluding tiles) — they cost around £500-£600.
How Much Does a Basin Cost?
Low end: from £50
Average cost: £60 – £150
Top end: £300+
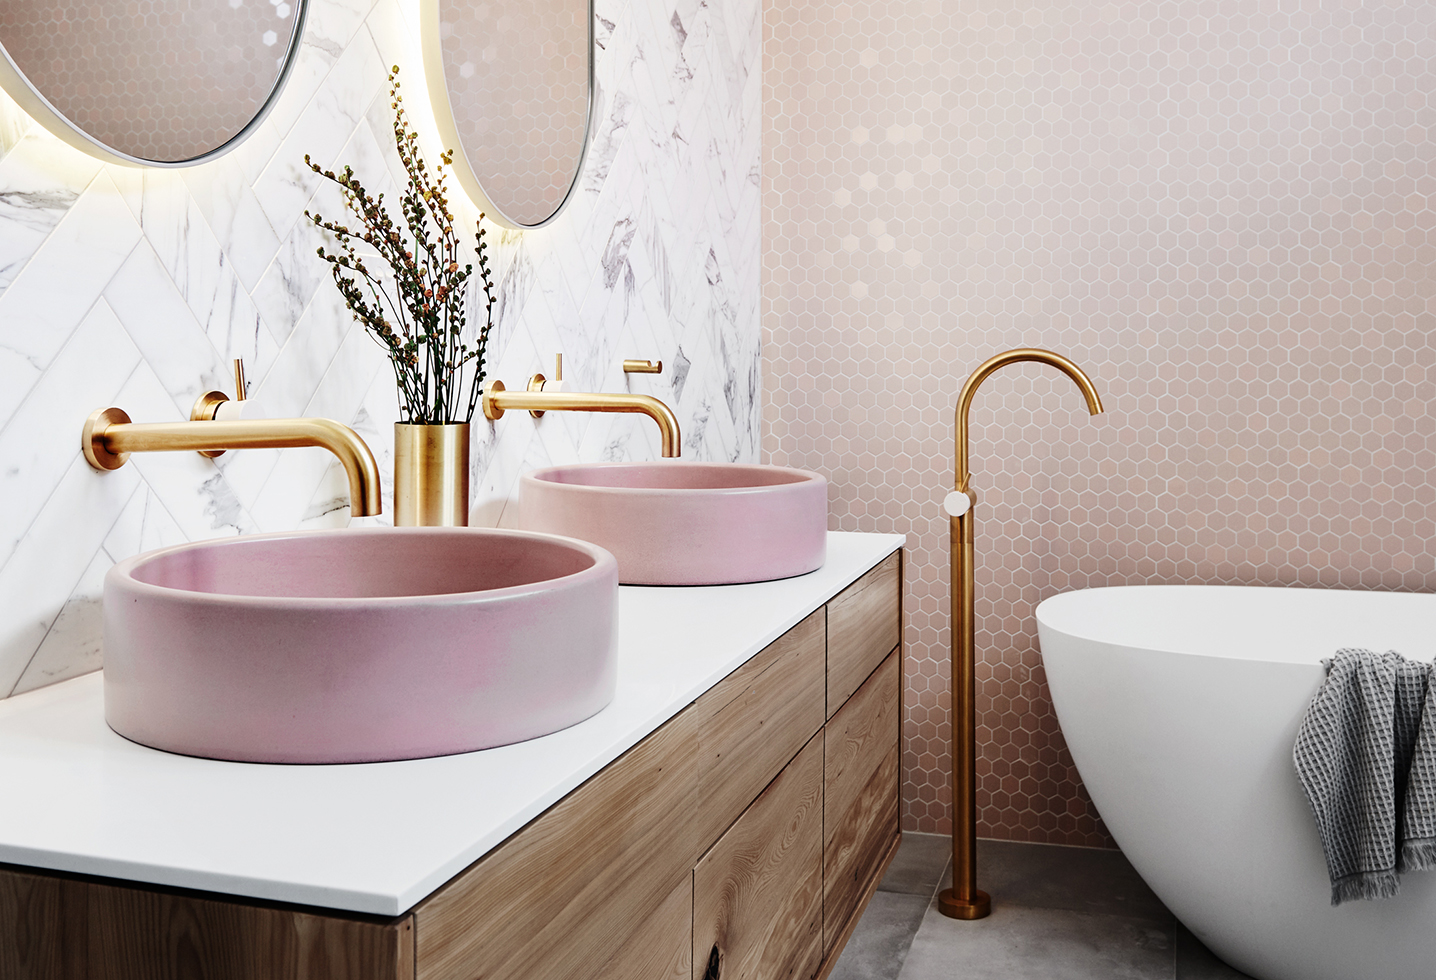
These stylish pink twin basins are from Norsu Interiors and look great combined with the brass taps.(Image credit: Norsu Interiors)
From as little as £50 you can pick up a ceramic pedestal basins.These are also convenient in that all pipework can easily be concealed behind the pedestal.
If you are after a more contemporary basin, consider a semi-pedestal or wall-hung basin. These basis cost from around £60. Remember that a wall hung basin will require a stud wall to be constructed from which to hang it and conceal the pipework.
Basins designed to sit in or on top of a vanity unit (including freestanding basins and semi-recessed models as shown above) allow for useful storage beneath. These basins cost from £90, but remember to factor in the cost of the unit they sit on or in, too.
While most basins are ceramic, glass, metal and stone are all options but cost more. The most common basin size is 550mm x 400mm.
How Much Does a Toilet Cost?
Low end: From £50
Average cost: £200 – £400
Top end: £500
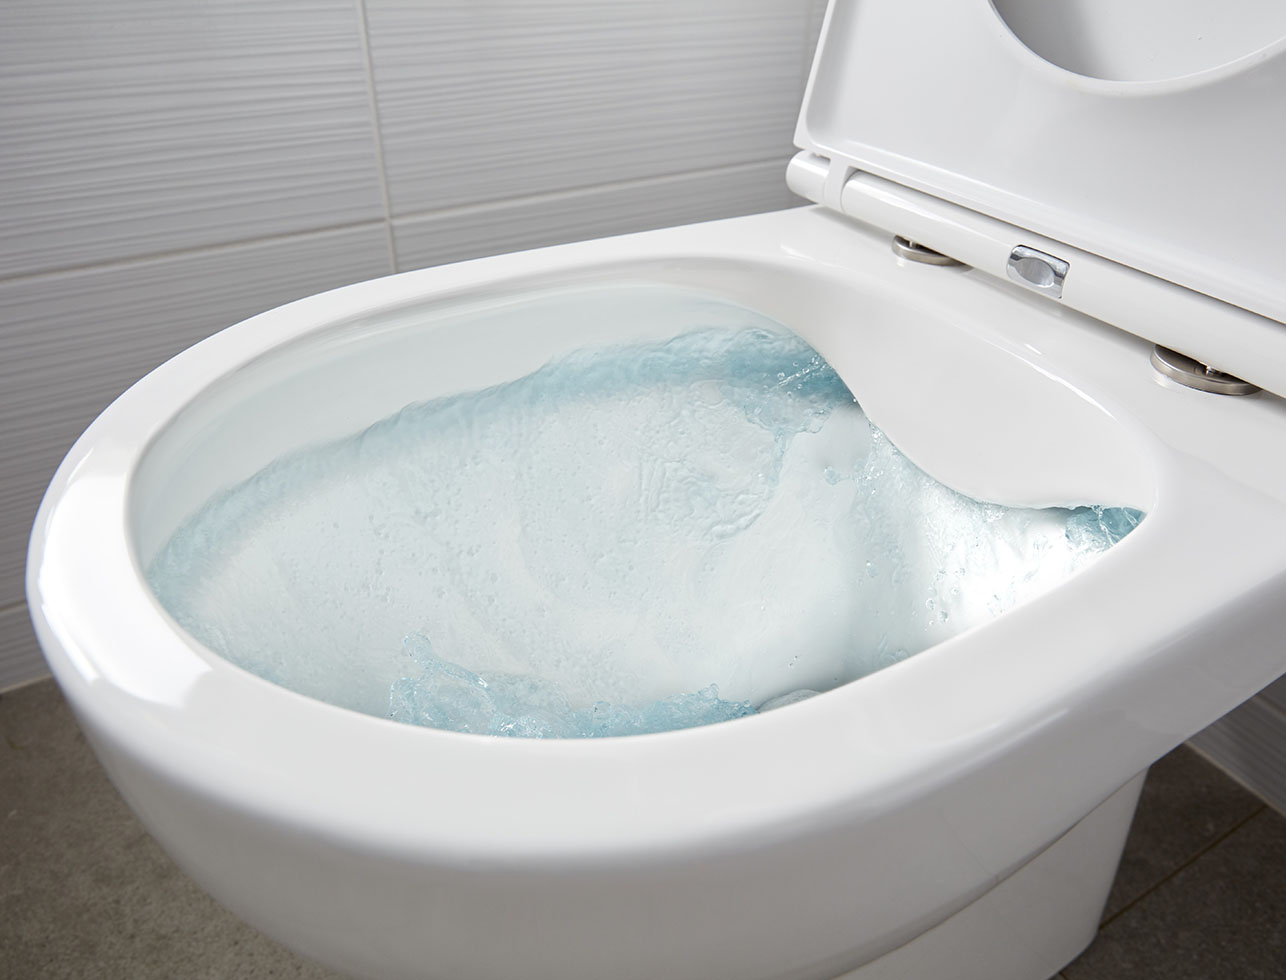
Floor-mounted, low-level WCs cost from £50. Traditional-style high-level toilets are another option, as are more modern-looking wall-mounted WCs — here the cistern and pipework is typically concealed within a frame in a studwall.
GoodHome Cavally Close-coupled Rimless Toilet with Soft close Seat. £99 from B&Q.(Image credit: B&Q)
Bathroom Tap Prices Explained
The very cheapest type of bathroom taps are pillar taps (taps with a separate tap for hot and for cold). They cost from £30 per pair.
Mixer taps that have separate controls for hot and cold flow tend to be next up the scale, from around £45, with monobloc mixers (where flow and temperature are both controlled from one lever) usually at the top, from £50 up to the low £100s.
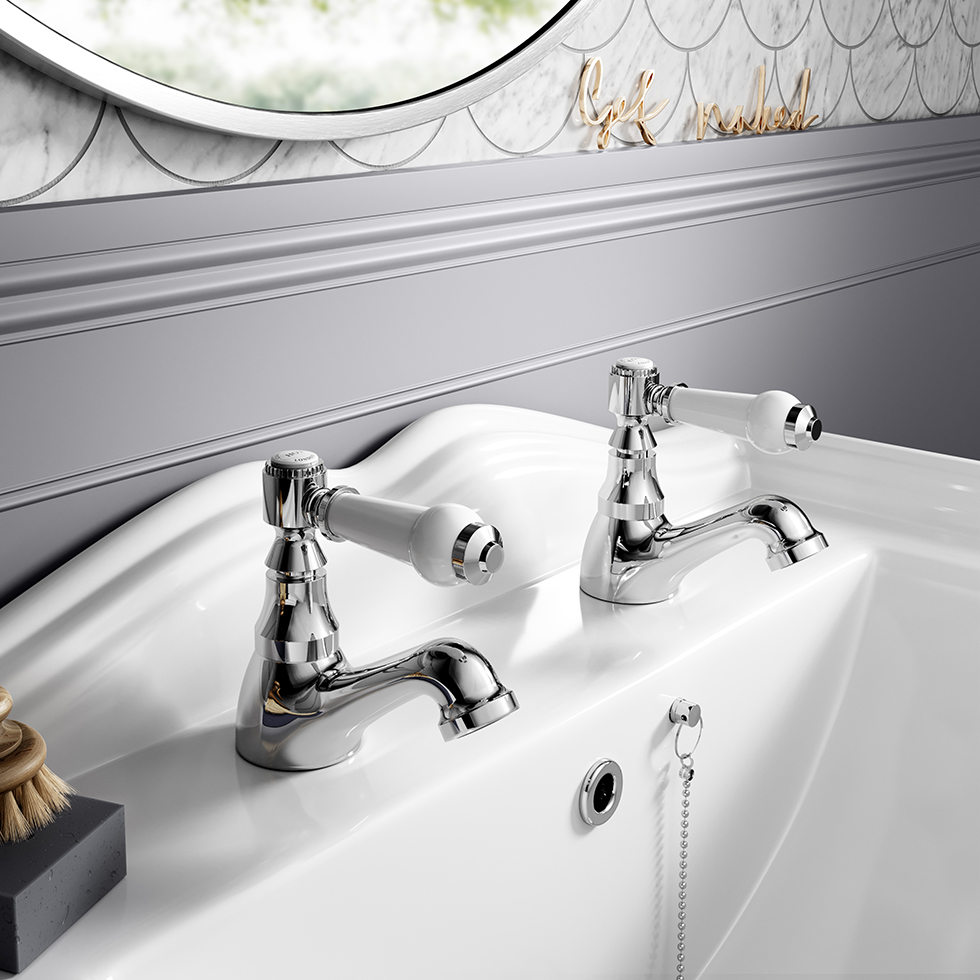
These Cherwell Traditional Basin Taps are made from solid brass with hand polished chrome finish and are from Bathroom Mountain. £34.99.(Image credit: Bathroom Mountain)
Your choice of sanitaryware will affect which taps you can have. Counter-top, bowl-style basins, for example, will require wall-mounted taps or those set into a vanity unit, while freestanding baths will need wall- or floor-mounted taps.
These can be more costly than simple mixer taps located on the bath or basin, both to buy and fit.
In addition to the obvious bathroom renovation costs, such as basin and toilet, don't forget to figure in extras such as:
An extractor fan
Bathroom flooring
Underfloor heating
Towel warmers
Plastering
Removing an old bathroom suite
Tile adhesive and grout
Lighting
Decoration
Floor reinforcement where nesessary
Bathroom cabinets
Natasha is Homebuilding & Renovating's Associate Editor and has been a member of the team for over two decades. An experienced journalist and renovation expert, she has written for a number of homes titles. She has renovated a terrace and is at the end of the DIY renovation and extension of her Edwardian cottage. She is now looking for her next project.
Replacing a faucet aerator is relatively easy with the right parts
If water from your faucet is squirting to one side or you've noticed the flow of water has slowed to a dribble, then it might be a clogged aerator that needs replacing. Faucet aerators come in several designs: housing, integrated thread, or special design models. On some faucets, it's impossible to replace the aerator at all, and other faucets don't have one to fix. Learn more about your options depending on the type of faucet and how to replace your aerator yourself.
Difficulty: 2/5
Time: 30–45 minutes
Tools and Materials Needed:
Expandable pliers with protective rubber jaws: $15
Wire bristle brush or old toothbrush: $9
Slot-headed screwdriver: $12
Teflon or silicone lubricant: $11 per tube
White vinegar to clean deposits:$7
Paper towels or an old rag: $0
The correct aerator for your specific faucet: varies
1. Remove the Old Aerator
Thankfully, faucet aerators are inexpensive and easy to remove. You can easily DIY without the need to hire a professional plumber. But sometimes, you may need a little elbow grease or small tools. You will need a special tool to remove a cache aerator. The device is size-specific and comes with your new aerator.
Remove It By Hand
Try unscrewing the old aerator from the faucet spout by hand. As aerators are threaded, they often unscrew quite easily. To get a good grip, make sure the faucet spout is dry.
Try Pliers
If unscrewing the aerator doesn't work by hand, you may want to try pliers. Make sure the pliers are protected with rubber jaws, so you don't scratch the surface of your faucet spout. Or, you wrap masking tape around your fixture to protect it.
Turn the aerator counter-clockwise to unscrew it from the spout. If it doesn't budge, try unscrewing it from a new position. Try not to grip the aerator too tightly as the metal may bend, making your job harder.
Heat It Up
If the aerator still won't budge, or you've accidentally bent it a bit, you may need to resort to heat. Using a hairdryer, you might be able to expand the metal, making it possible to loosen the metal aerator. Don't try this on plastic aerators, and don't use high heat as any rubber washer or plastic parts may melt.
Grab the Oil
You can also try oil, such as WD-40 or a similar product, which costs about $6 at your local hardware store. Spray it on the threads and let it sit for a few minutes, then use pliers to loosen the aerator. The oil makes the metal slippery, so it may take a couple of tries.
2. Find the Right Type of Aerator For Your Faucet
Dougal Waters/DigitalVision via Getty Images
If the metal screen or other parts on your aerator are rusted or damaged, it's best to buy a replacement aerator assembly. You'll find a variety of options at the store, so be sure to choose the right size and type for your faucet.
Stationary Aerators
These are the most common. They screw into the end (tip) of the faucet spout and, as the name implies, don't move.
Male or Female Aerators
If an aerator has threads on the inside, it's a female aerator. Female aerators are installed on male faucet spouts that have threads on the outside. If the aerator has external threads, it is a male aerator and will be connected to a faucet spout with internal threads.
Dual Aerators
These aerators have both female and male threads, usually separated by a split washer inside the aerator.
Standard Aerators
Standard aerators are visible because they extend from the faucet spout.
Cache Aerators
These aerators are hidden up inside the faucet and are typically found in high-end faucets.
Swivel Aerators
With a swivel aerator, you can direct the water in different directions, either by retracting or pulling it. Swivel aerators are usually found in smart or modern kitchen or bath faucets. Some swivel aerators have a small outlet on the side for attaching a hose. This allows you to use the aerator while diverting water to a filter.
3. Determine the Right Size Aerator
Manu Vega/Moment via Getty Images
Faucet aerators are not universal. You will need to determine the size of your old aerator before replacing it.
Standard Aerators
Standard aerators come in three sizes. Remove the old aerator from your faucet and lay it on a flat surface next to a quarter, dime, or nickel.
If the aerator is the size of a nickel, you will likely need a Tom Thumb-size aerator. The average cost is about $3–$5.
If the old aerator is the size of a dime, you will need a junior-size aerator. The average price is $4–$8.
If the aerator is quarter-size, you will need a regular-sized aerator at the cost of about $3–$6 each.
Cache Aerators
Cache aerators come in four different sizes, so you'll need to pick a pocket for a penny too. Each of the measurements above applies to cache aerators also, except for aerators that are the size of a penny. If your old aerator is the size of a penny, you will need a tiny junior-size aerator, which costs about $4 to $8.
4. Choose the Water Stream You Need
Depending on what the faucet is used for, there are three different types of water streams to consider.
Aerated Stream
These are the most common type of faucet aerators. They work by introducing air into the water to produce a whiter and broader stream.
Spray Stream
Spray stream aerators provide wide coverage.
Laminar Stream
These aerators are all water with no air mixed in. They are typically non-splashing and best for faucets where high water flow is needed.
5. Replace Your Faucet Aerator
Replacing a faucet aerator is much easier than replacing your kitchen or bathroom faucet, and sometimes all you need to do to see improved water flow. After you've removed your old aerator and found the right size and type for your specific faucet, you can now take these steps to install your new aerator.
Plug or Cover the Drain
When you've chosen the correct aerator and have it in hand, the last thing you need to do is lose it down the drain.
Run the Water
To remove any lingering debris in your faucet, turn on the water full blast for a few seconds to flush out any particles.
Screw in the New Aerator
Screw in the new aerator slowly to avoid bending, denting, or cross-threading it.
Tighten
Tighten your new aerator as tight as possible with your fingers. Check the flow of water by turning on the faucet just a bit. If you notice leaking around the aerator threads, tighten the aerator slightly more using your pliers with a protective rubber covering. You can also wrap the end of your faucet and aerator with tape to protect the finish.
If you are replacing your aerator with a cache aerator, you will need to use the special tool that came with the aerator to tighten it.
Redecorating the rooms in your home can bring some chaos, but it also brings a lot of excitement as you watch an entirely new look come to life in rooms that had become mundane and dated. The long-term enjoyment and satisfaction you get from a newly redesigned bathroom, for example, is more than worth the short amount of time you spend completing the work.
When you're decorating a particularly small bathroom — or any small room — you have to make the most of every bit of available space. From creating practical spaces to letting your design imagination shine through, you could take your new bathroom in many different directions. Let's take a look at some great design ideas for small bathrooms.
Go Bold with Wallpaper
Wallpaper may seem like a dated idea, but many of today's modern prints and designs look nothing like those blocky, geometric designs from days gone by. Bold prints and striking patterns that might look overwhelming in a larger space can really shine in a small bathroom. Choose an accent wall and decorate it with bright colors or a punchy pattern or go dramatic and wallpaper the entire bathroom in a textured print.
Photo Courtesy: Tracy A. Woodward/The Washington Post/Getty Images
Keep Counter Lines Clean
If you have an ample budget, changing your bathroom counter can really change the entire feel of the bathroom. Choose a design that adds crisp, clean lines to the space. Decorative finishes and scalloped edges may seem fancy and tempting, but they can distract from the rest of the room and diminish your counter space. Additionally, patterned designs on the walls call for "non-busy" counters and accessories to avoid a cluttered feel.
Photo Courtesy: FluxFactory/E+/Getty Images
Add a Design Element to the Ceiling
If decorating the walls isn't your style or you don't have a lot of open wall space, consider adding an eye-catching design element to the ceiling instead. Drawing visitors' eyes up to the ceiling helps create the illusion that your overall bathroom space is much larger than it actually is, according to Elle Decor.
Photo Courtesy: David Papazian/Corbis/Getty Images
Consider a Floating Sink
Okay, so maybe floating sinks don't really float, but these types of pedestal sinks with no surrounding counters almost give the impression they are really suspended in midair. This sink style allows you to eliminate bulky counters and cabinets by skipping the traditional bathroom vanity. If counter space isn't important to you, look for a modern floating sink with minimal plumbing to keep your walls and floor tidy.
Photo Courtesy: John Lovette/Photographer's Choice RF/Getty Images
Think Outside the Shower Stall
Traditional shower stalls and bathtubs take up a lot of valuable space in a tiny bathroom. If you've got the budget for a full replacement, consider turning your standard bathroom into a European-style bathroom with an open shower and drain on one end of the room, partially separated by a transparent sheet of laminated glass.
Photo Courtesy: Onzeg/E+/Getty Images
Try Hanging a Towel Bar
If you plan on keeping the counter and you need more counter space, hang a towel bar (or two) to free up space. These bars can hold standard hand towels or even full-size body towels in most cases. This use of vertical storage space saves some of your limited square footage for other uses. As a bonus, you can find plenty of towel bars with decorative designs to spruce up your walls as well.
One of the biggest problems in a small space is the lack of light, and dark rooms with poor lighting look not only dismal but also seem much smaller than they actually are. If your bathroom has a window, install decorative blinds or a window shade in a color and material that lets some natural light in, even when the blinds are closed or the shade is pulled down.
You know how funhouses always have halls and rooms with funky mirrors in them? The logic is simple — mirrors are great at creating optical illusions. Oval mirrors, in particular, create an illusion of height, and every mirror reflects both artificial and natural light to make rooms much brighter. Place an oval mirror over the sink or an open wall to add brightness and create the illusion of extra height in your small bathroom.
Photo Courtesy: tulcarion/E+/Getty Images
Use Ledges or Shelves for Storage
If you're completely remodeling your small bathroom, consider choosing a shower and tub enclosure with storage ledges in the walls. If your do-over isn't that extensive, you could hang shelves in the shower enclosure or above the sink. Ledges and shelves are great for storing shower and hair products that you don't want cluttering your counters.
Photo Courtesy: Image Source/Getty Images
Choose Flexible Storage Options
As much as you want to avoid clutter in a small bathroom, it's inevitable that you need certain items in the room. The storage items you choose are determined by the style choices you make throughout the room. If you opt for a pedestal sink, you might be able to slide a basket with fresh towels underneath it. If your shower doesn't have shelves, then look for a hanging shower caddy to drape over the shower head to hold your supplies. If you hang a shelf near your sink, pick up some cute containers to place on it to hold your toothbrush, toothpaste, hairbrush and other essentials.
SMALL MASTER CLOSET FLOOR PLAN + DESIGN TIPS - MELODIC LANDING PROJECT
For this week's journal entry, I'm moving on to the master closet design for the Melodic Landing Project, a charming 1938 Cape Cod that is located in a beautiful treelined, historic neighborhood in Northern California. When the project is finished, it will have gone through a complete overhaul, be doubled in size, and be even more charming than ever before.
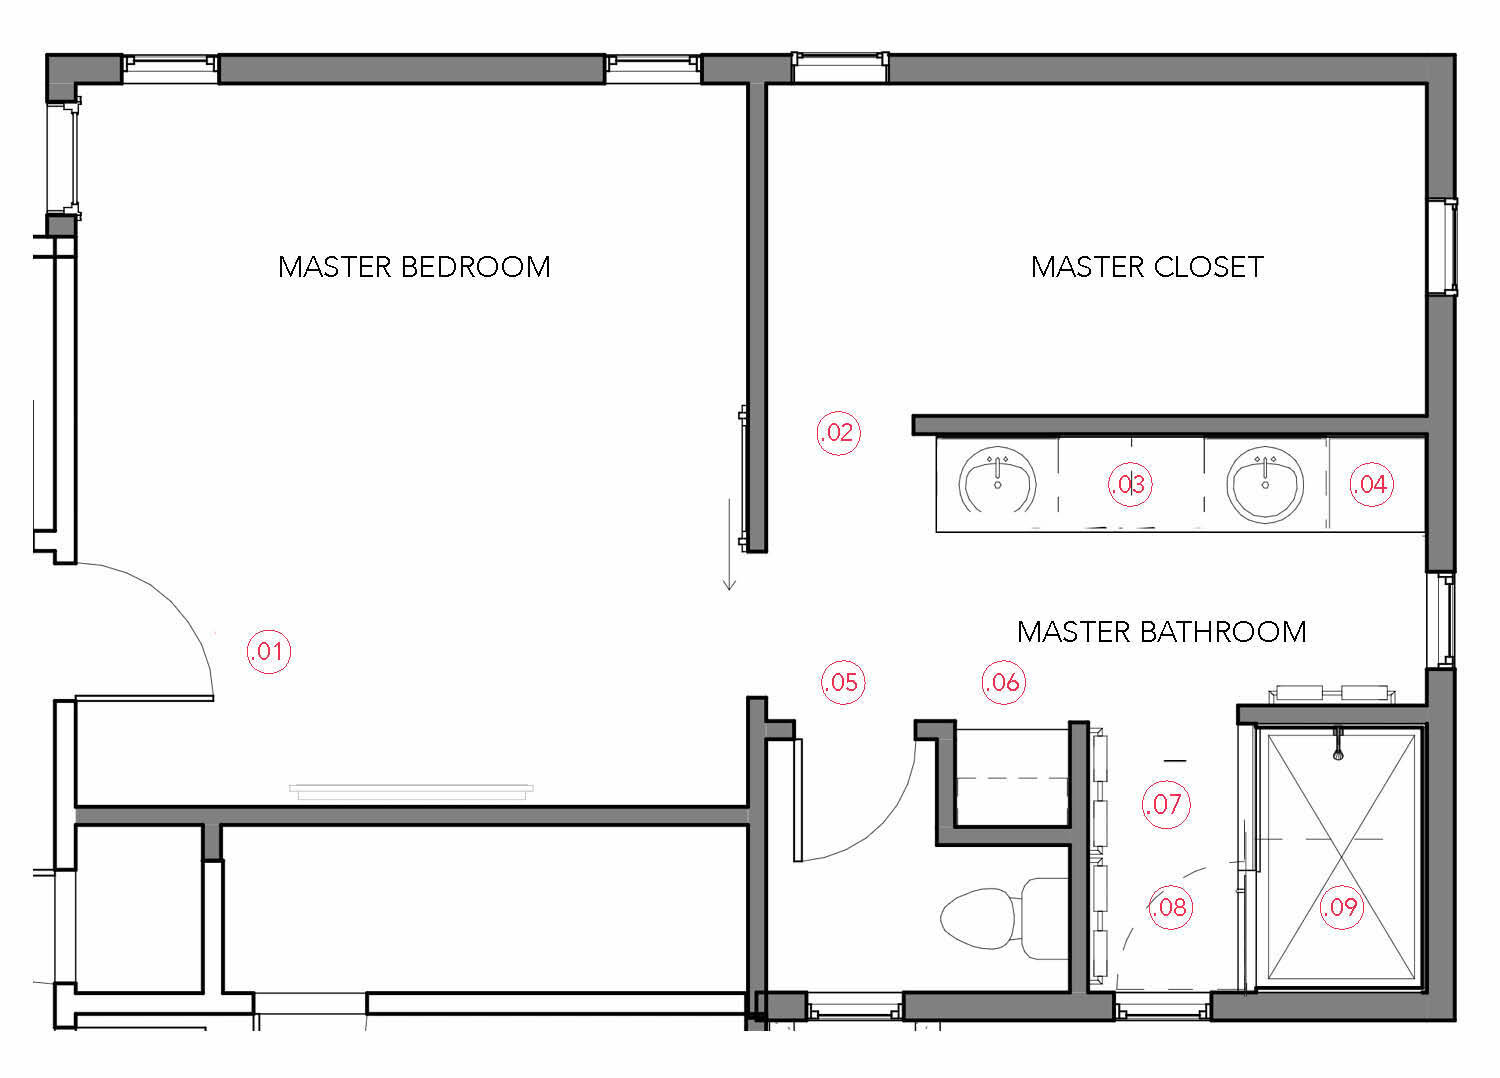
MASTER BEDROOM, BATHROOM + CLOSET FLOOR PLAN + DESIGN
In a recent post, I shared the master bedroom, bathroom and closet floor plan that was provided by the clients, my redlines (showing what's not working) and then the perfected final floor plan and elevations, along with commentary describing the why's and why-nots behind the design. In the interest of time, I didn't share much about the closet design other than to point out that it needed a door. For this post, I'll be focusing on that space.
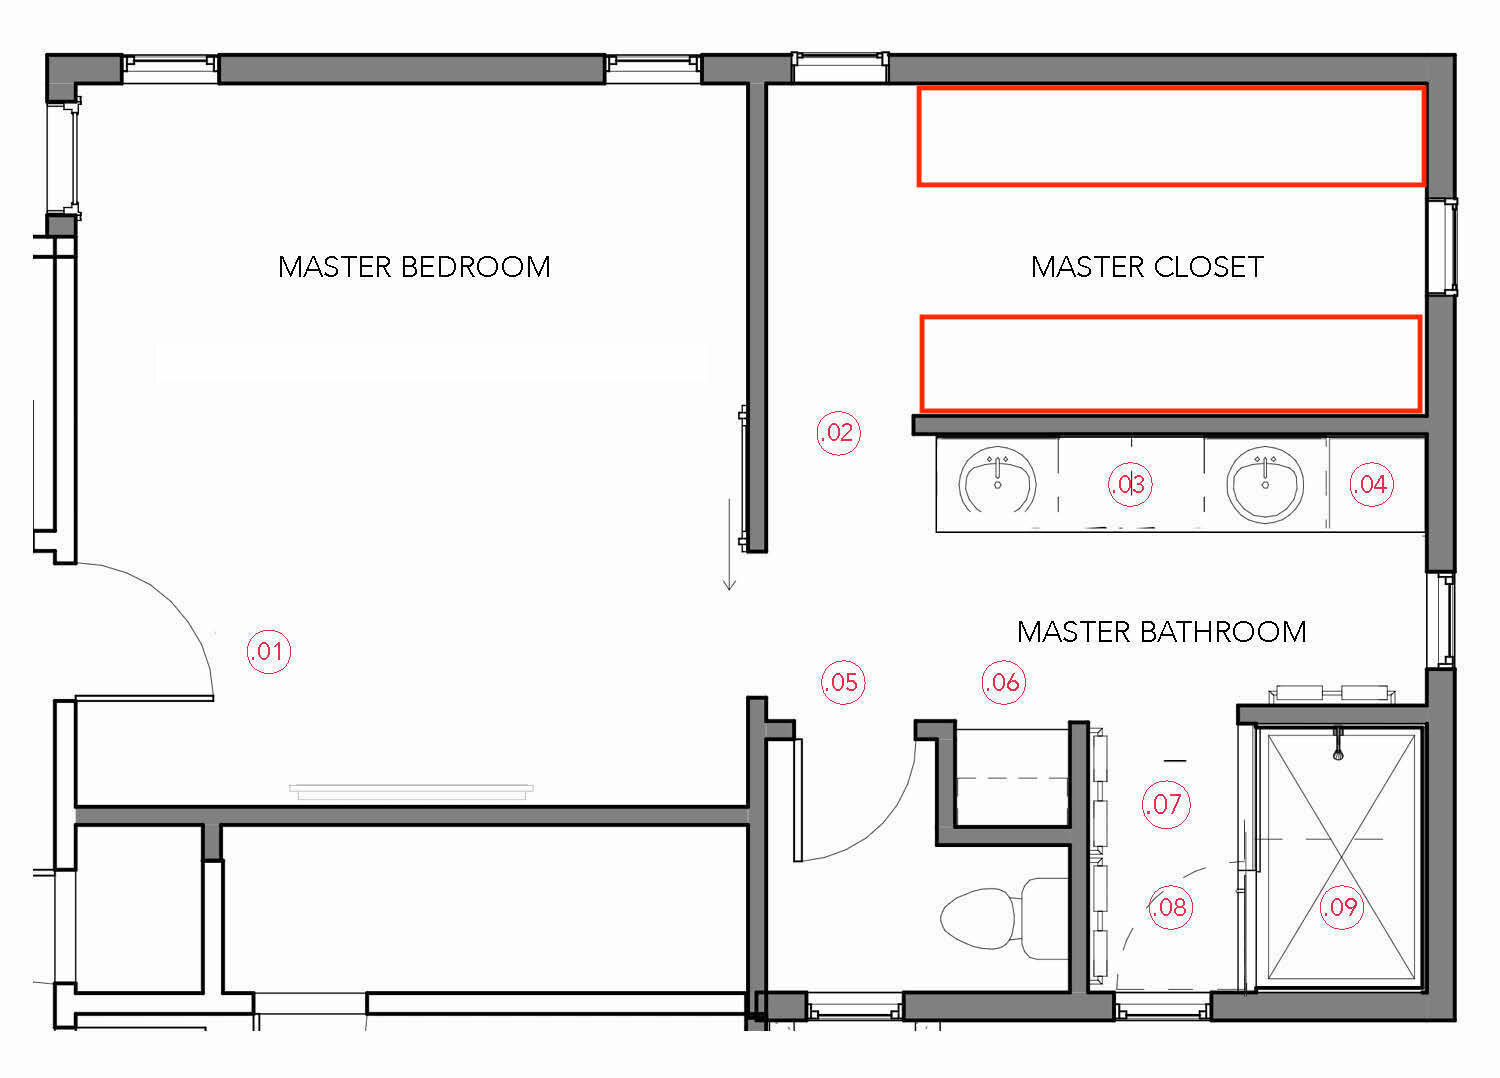
WHAT'S NOT WORKING
As shown in the proposed plan, no door was included between the bathroom and closet. If we had an abundance of space so as to be able to design a fitted closet, complete with custom cabinetry, much like an upscale dressing room, then not having a door between the spaces would be ideal.
Unfortunately, that's not the case with this project. Not having the opportunity to shut the closet space off from the bathroom would create visual chaos and cheapen the rooms. A master suite should be given full design attention and be elevated and refined.
As you can see though from the floor plan, the master wing of the houseis quite small by today's standards. The size of the bathroom and closet addition was determined by the lot size and the historical review committee. Even so, that doesn't mean that the space isn't sufficient to achieve a master suite with all the amenities of a well designed space, it just needed to be planned efficiently and more thoughtfully. *To see more specifics about what's not working in the master bedroom and bath, go here.
MASTER BEDROOM, BATHROOM + CLOSET FLOOR PLAN WITH REDLINE NOTES
PROPOSED CLOSET PLAN
Although the proposed plan doesn't show any conventional graphics to represent closet storage, as designed with the size and the location of the windows, only two of the four walls could be utilized for storage, and even at that there would be limited space for circulation, making the space crowded, tunnel-like, and difficult for two people to be in the space at once.
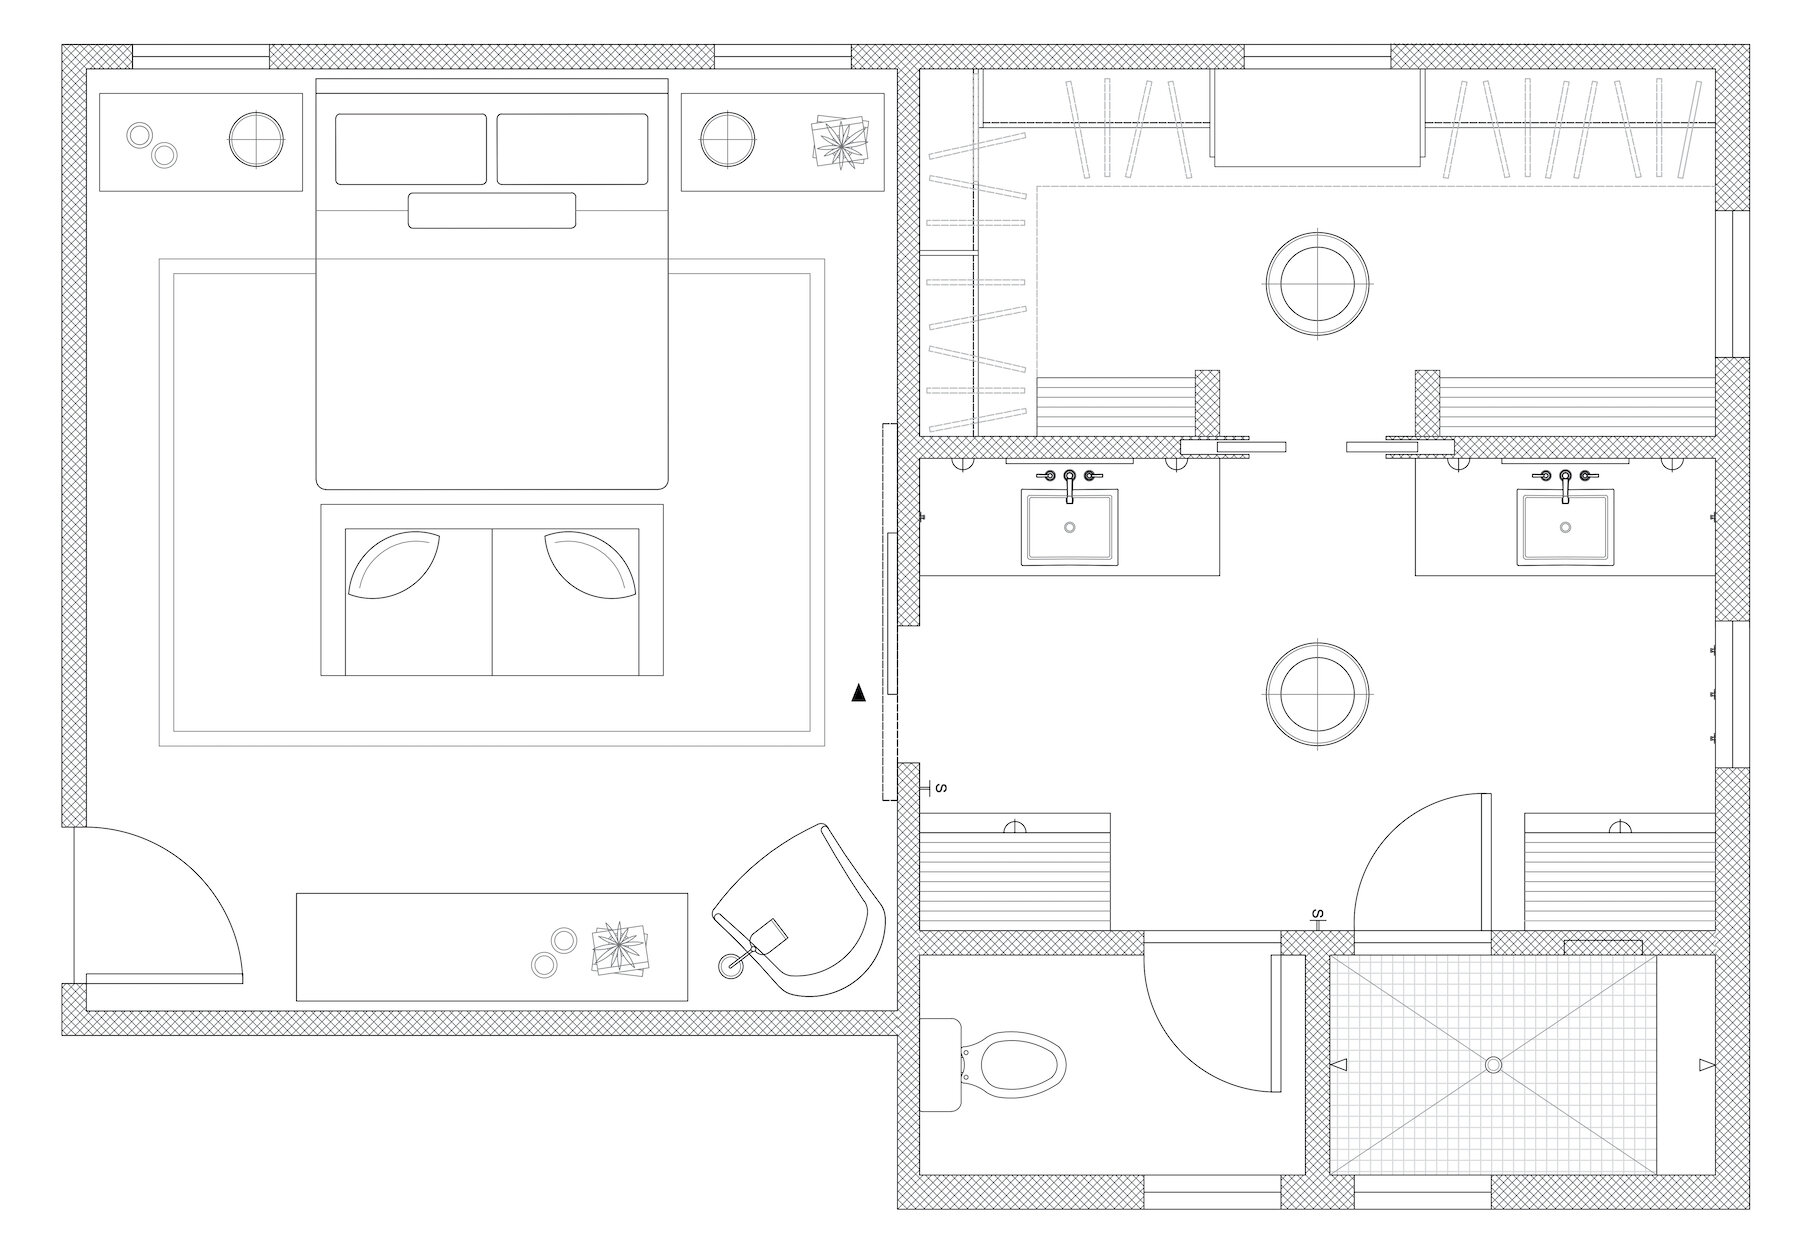
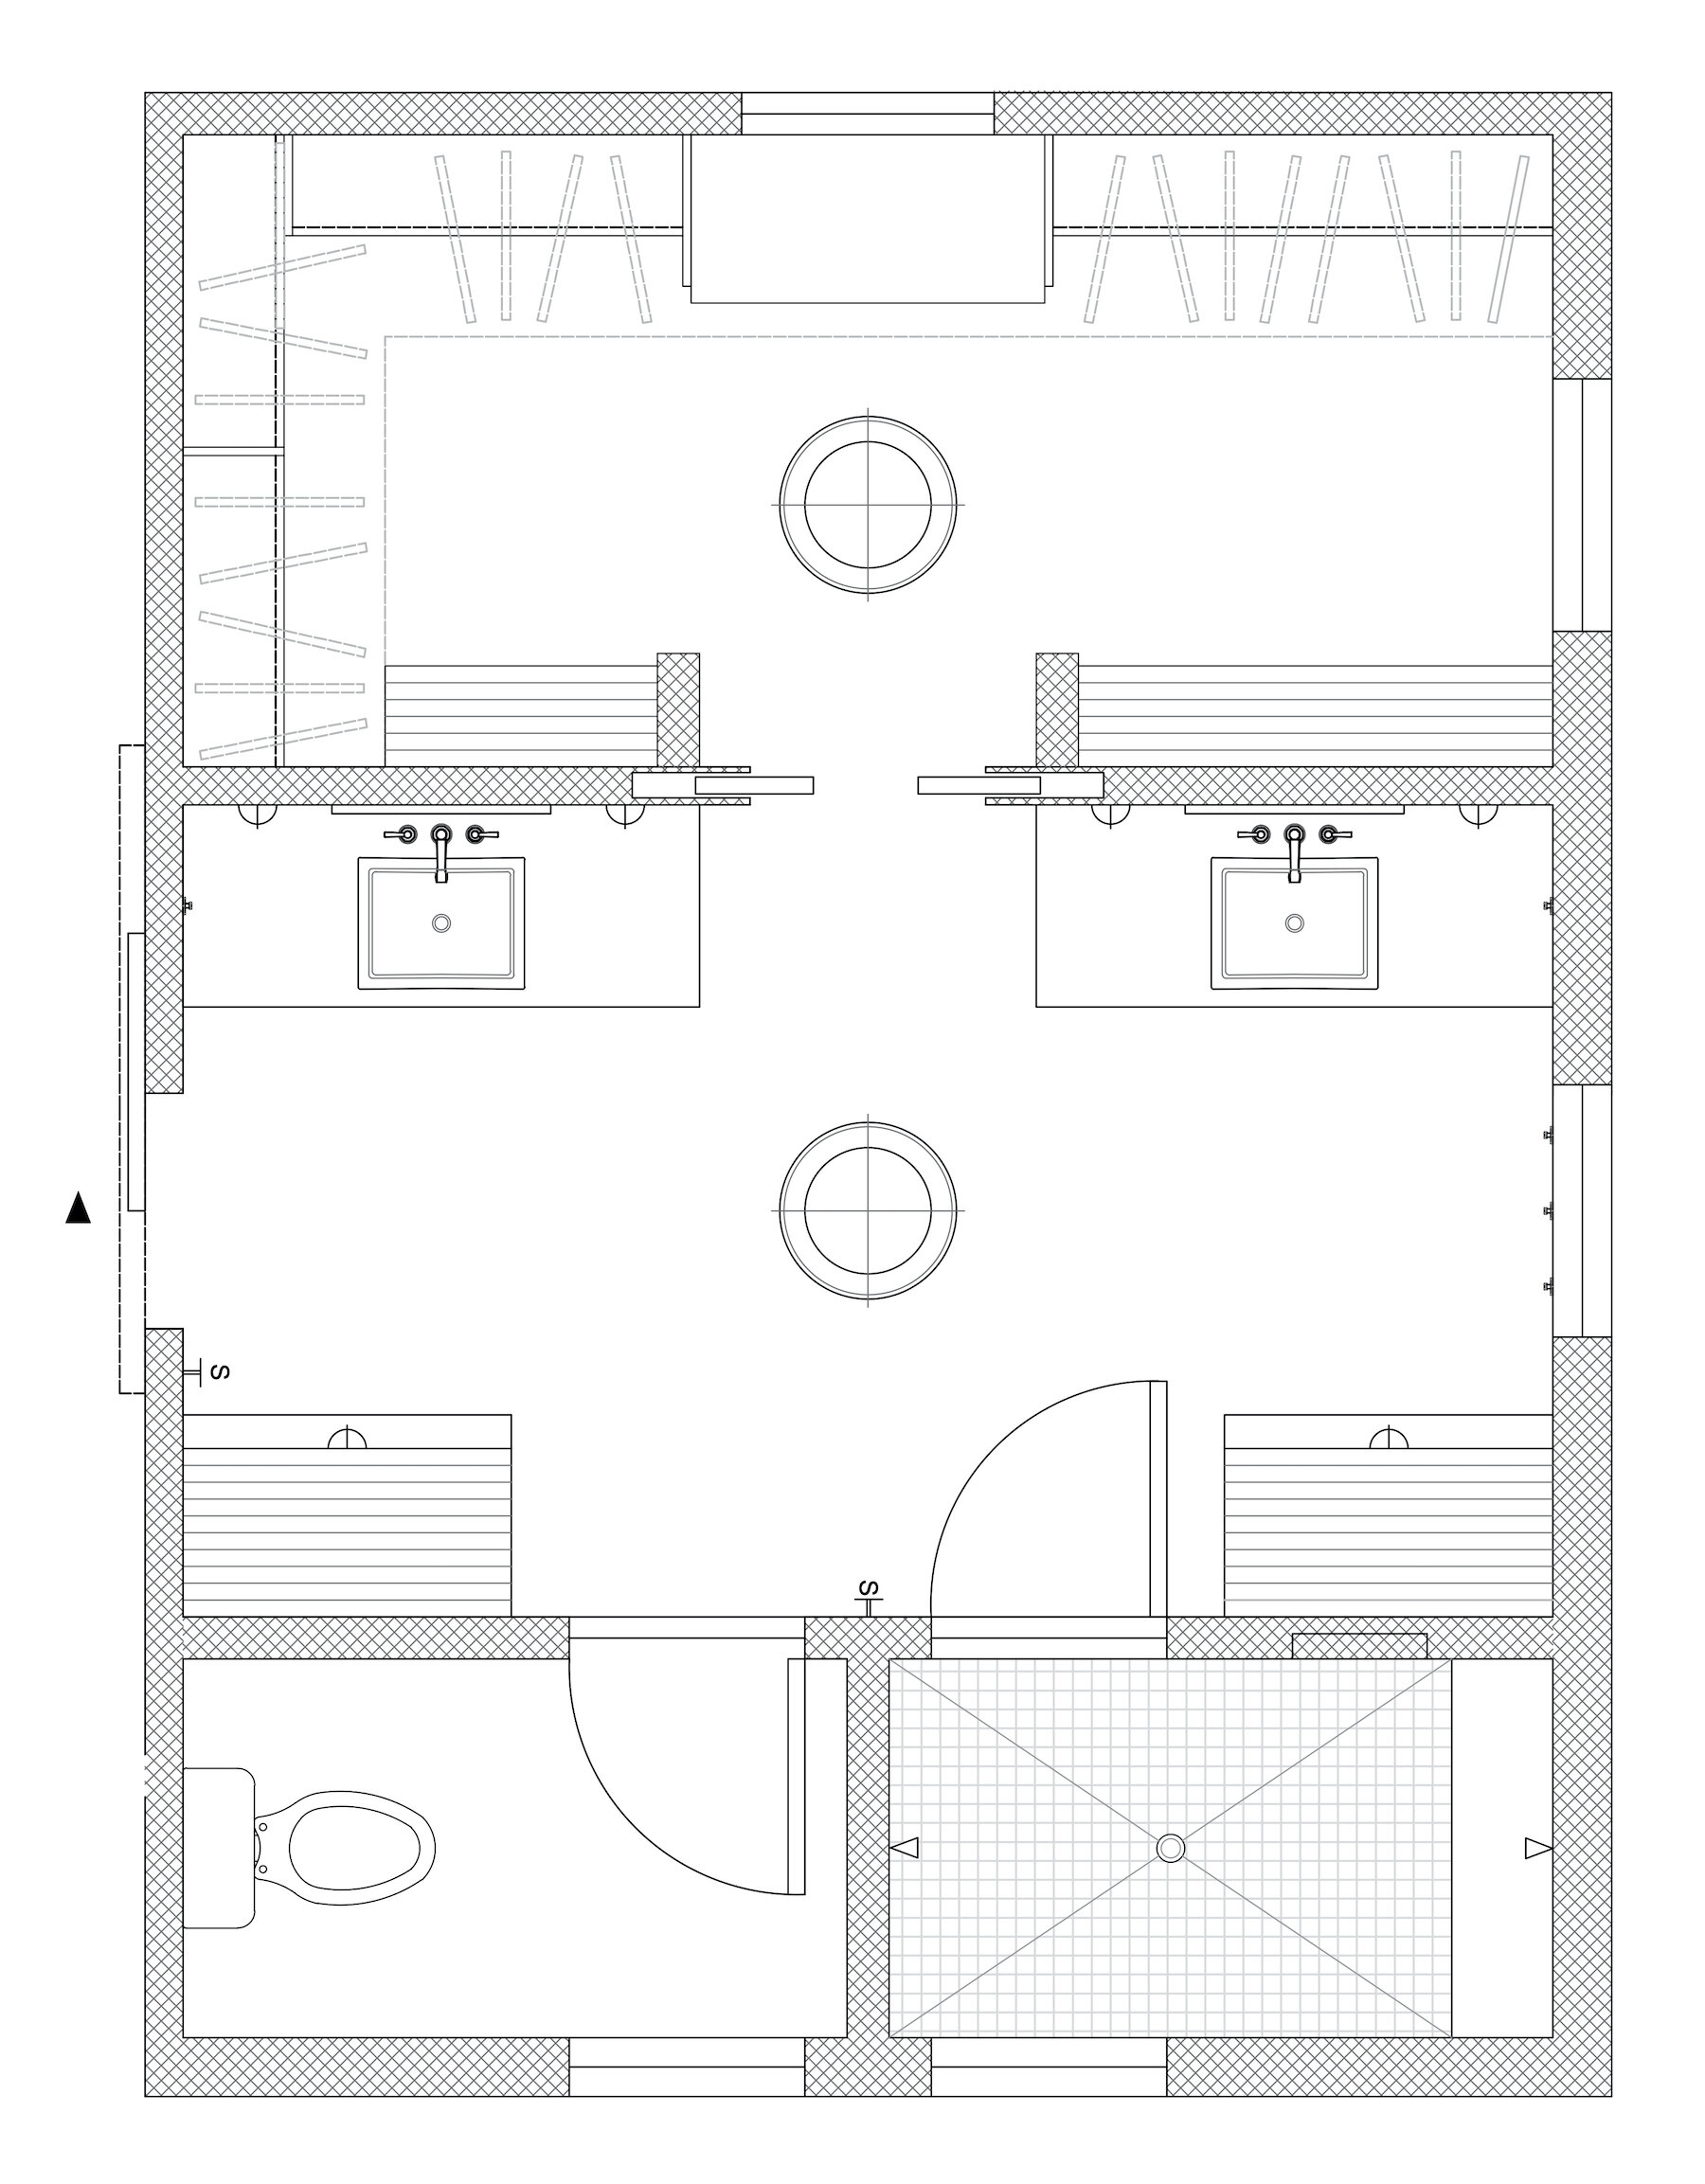
MASTER BEDROOM, BATHROOM + CLOSET FINAL FLOOR PLAN
Here's the perfected, and final floor plan for the master wing, including the closet space. You can see more about what's not working with the proposed plan, and the why's and why not's about the design solutions in a previous post.
MASTER BEDROOM, BATHROOM + CLOSET FLOOR PLAN
SMALL CLOSET DESIGN CHALLENGES
Designing small spaces is always more challenging than designing where there is an abundance of space available. Every inch needs to be considered so as to elevate the utility and function of the space.
Often times closets are located within interior walls where the space is generally less favorable. That way the more premium spaces can be given to rooms and areas where windows are at the upmost importance. Given that the master bath and closet for this project will be an addition on the side of the house that has prominent street facing views, the integration, location and sizes of the windows were a critical part of the design. Fortunately, when I received the plans, we still had some flexibility as to the window locations. That allowed me to locate them in places that offered the most storage possible.
When a closet has windows, it's especially critical that the storage is held back far enough away from the windows so as not to crowd or obstruct the windows in anyway. Otherwise it would cheapen and create an eyesore from both the interior and exterior views.
As noted above, the proposed closet plan didn't allow enough room for proper hanging depth for clothes and then circulation between the two sides. To avoid the crowding in this plan, one wall could be dedicated for hanging clothes and the other to open shelves that don't require as much depth, or a combination of both on each wall. Even so, that solution doesn't offer the best utility and function for the space.
Given that the entire wall to the left, when entering the closet space is empty and that no door was included in the plan, there would be plenty of room to locate the light switch when entering the space, but that's only because of the inefficiency of the how the space was planned. That said, when you need every inch to make a space work, it's easy to overlook where light switches will go.
When designing small spaces for more than one user, it becomes even more important to thoughtfully plan the space so both people can utilize it at the same time, without causing frustration and irritability, especially when hurrying to get ready for the day at the same time.
SMALL CLOSET DESIGN SOLUTIONS
In reviewing the final floor plan, notice how each of the challenges above were addressed. The floor plan has been perfected and refined with both the use and functionality of the space, and also with the over-all presentation.
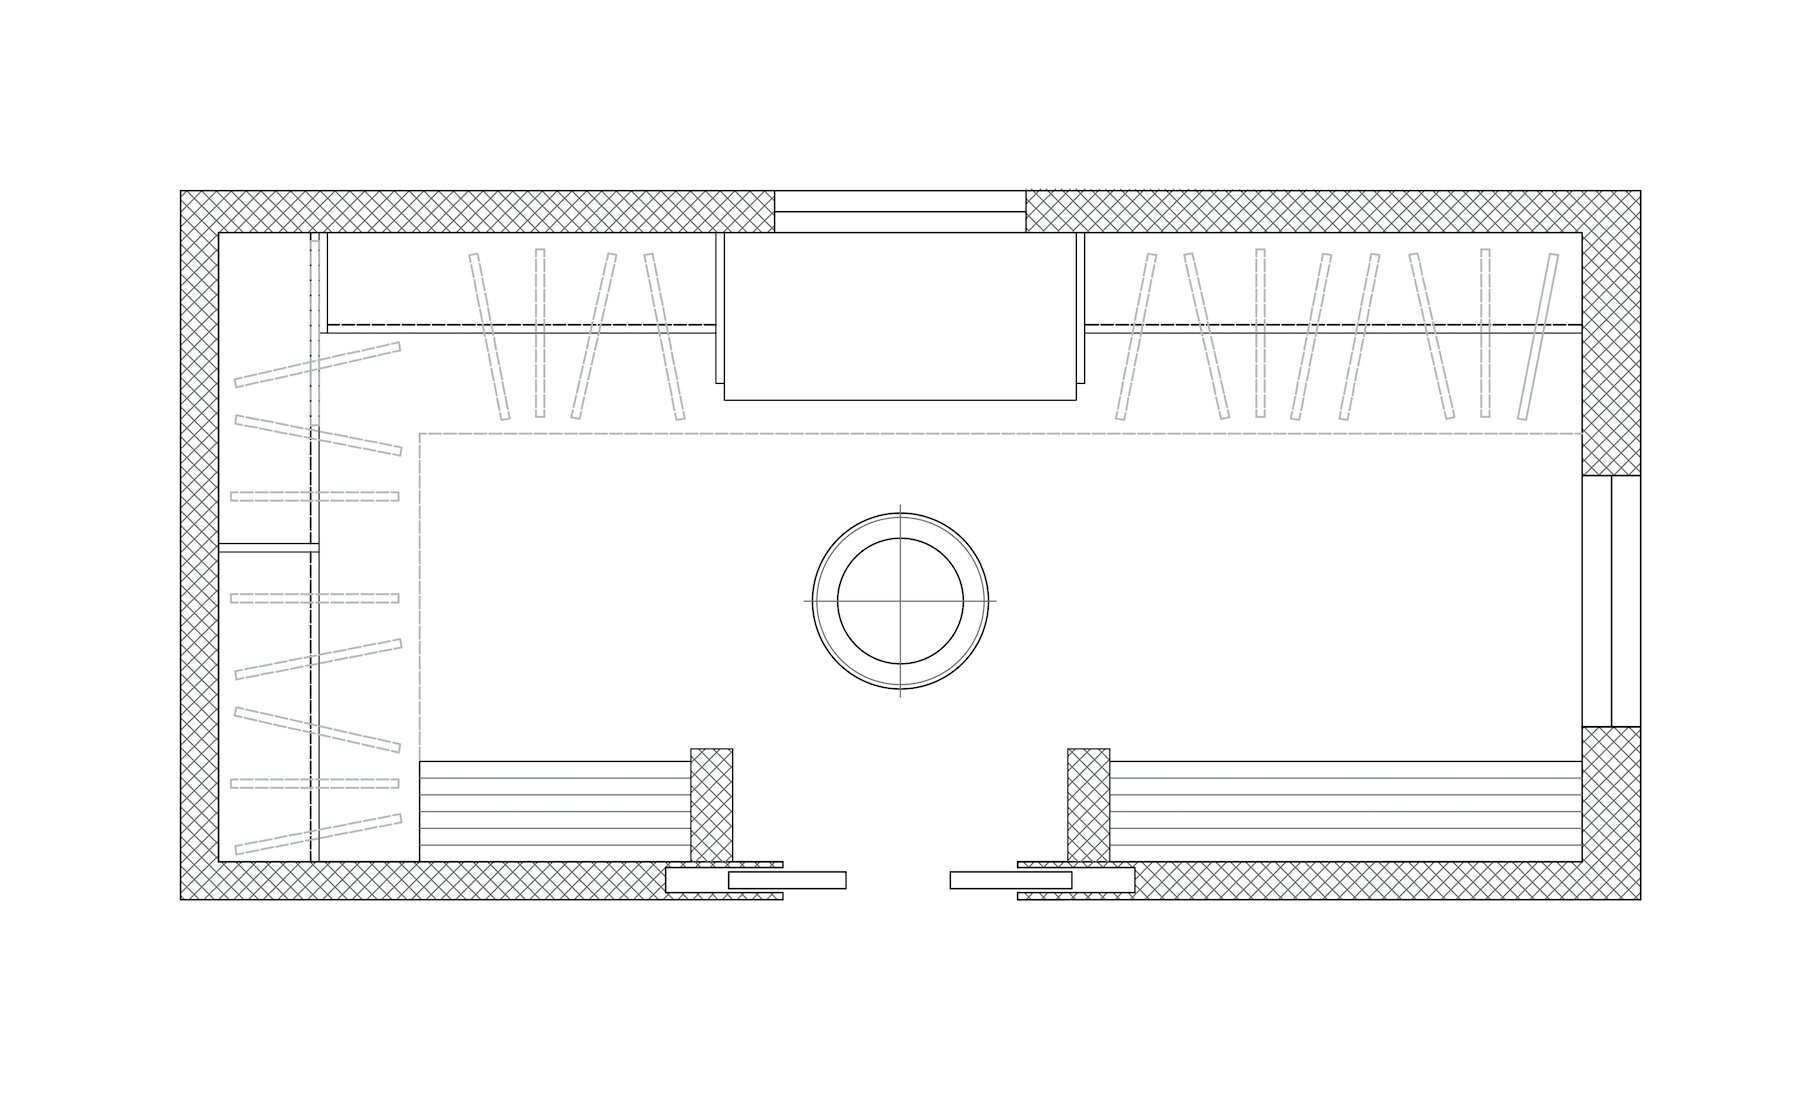
The windows were located in areas that allowed for the most amount of storage possible.
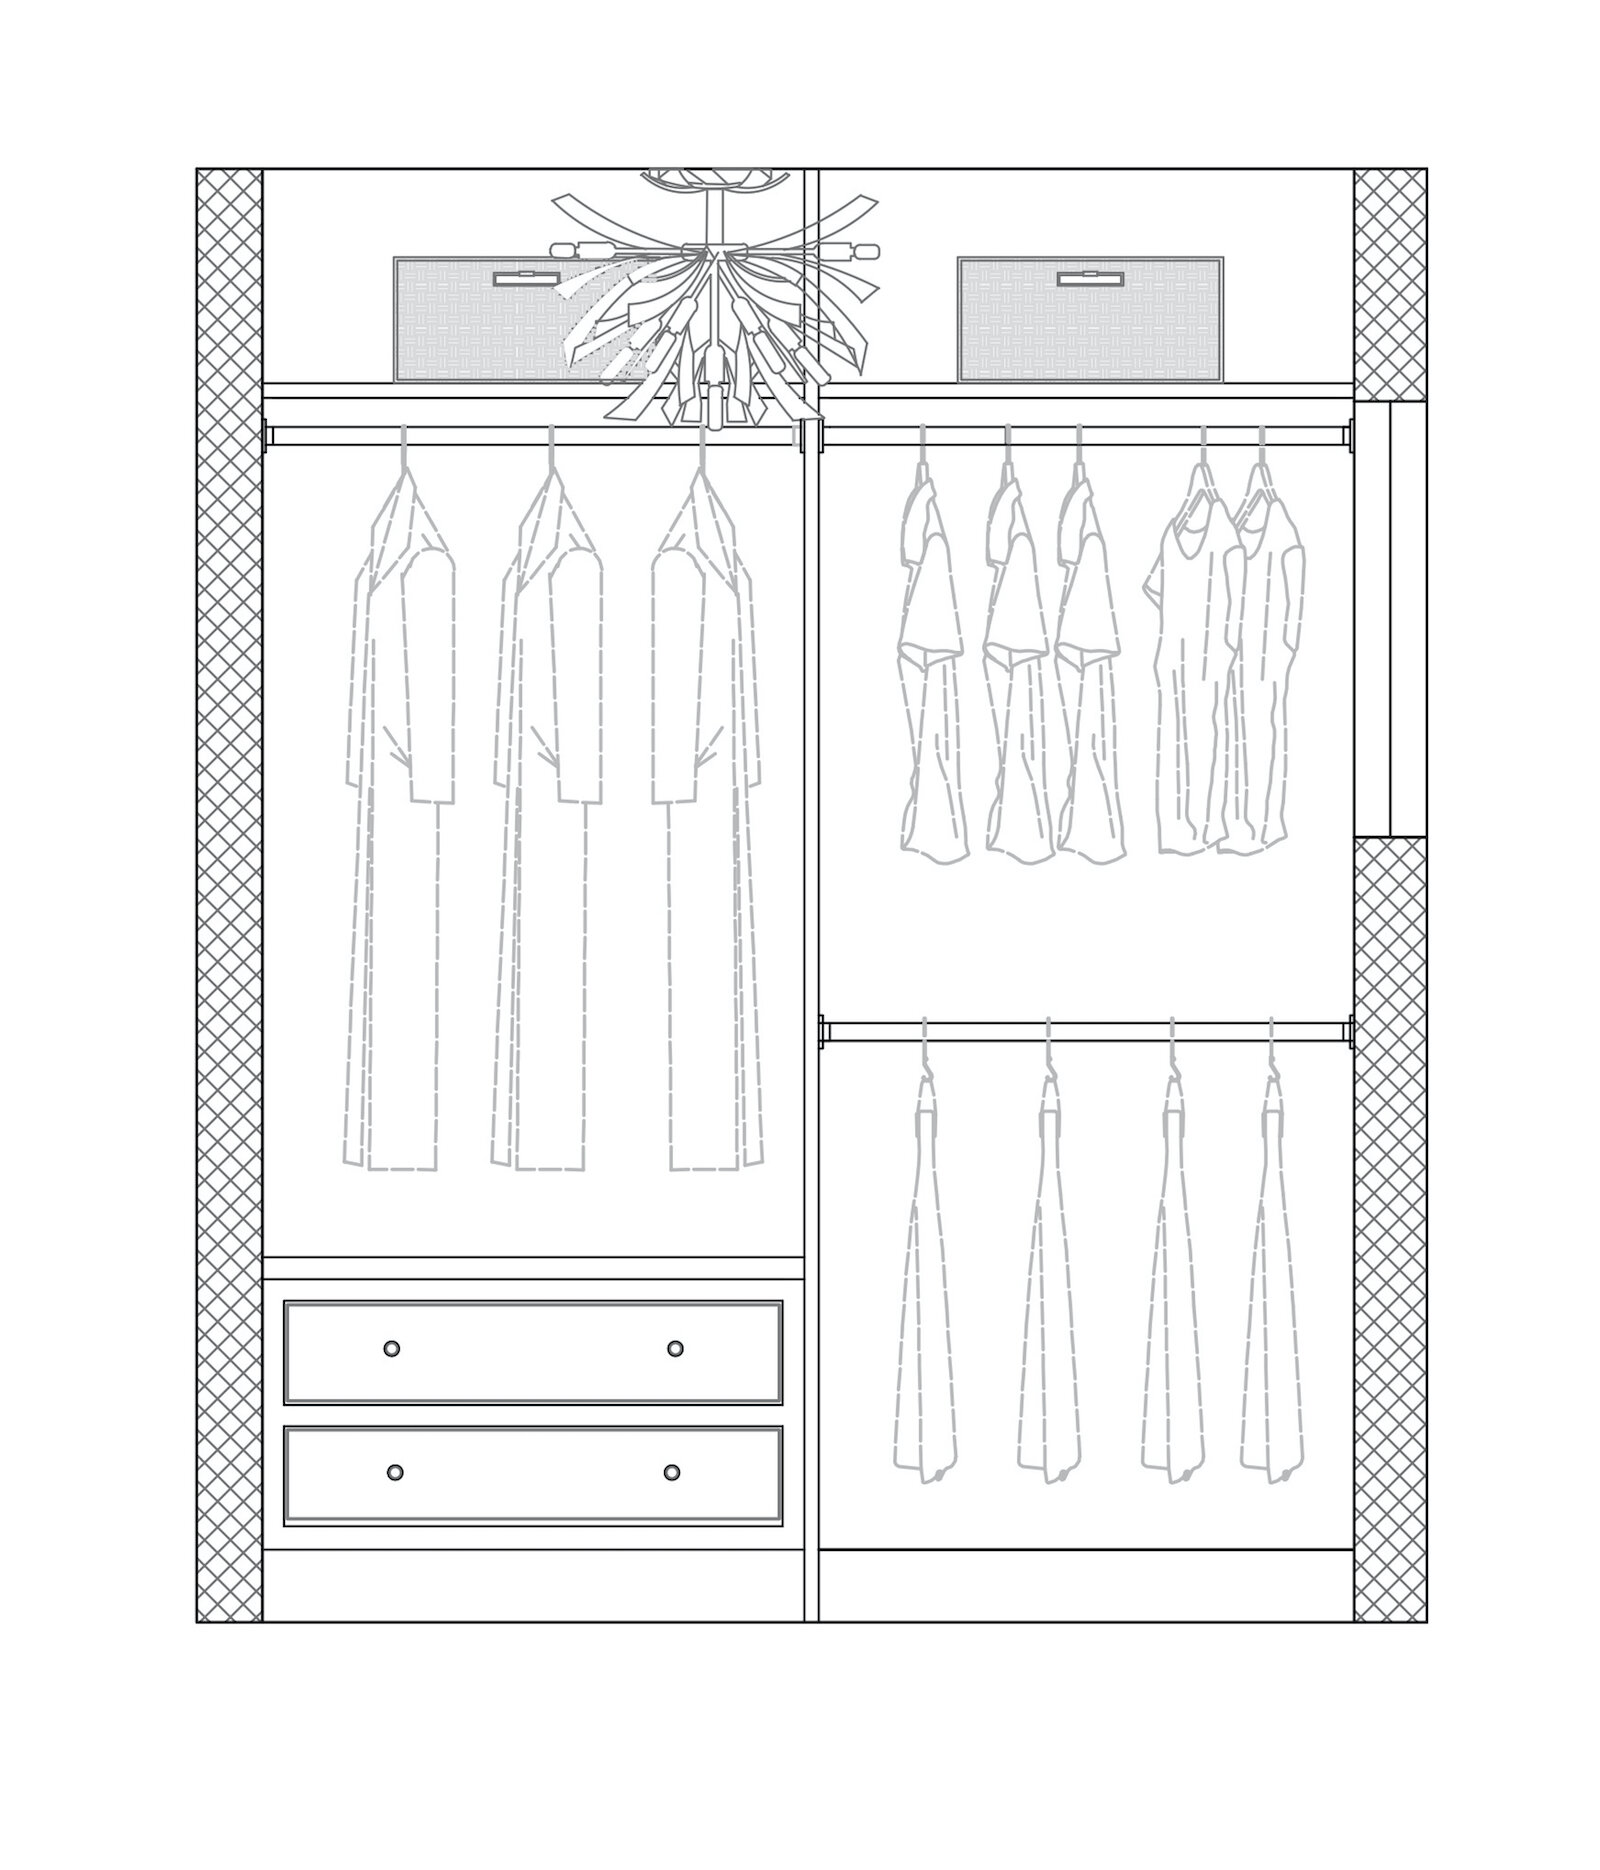
Notice in the perfected plan, how we've included lines simulating the standard clearances for hanging clothes. This was done to assure that there would be enough clearance between the clothes, the window trims and the start of the actual windows to avoid any blocking or crowding into the window spaces.
In the plan below, there's a nice mix of open shelves with hanging rod (shown with double lines and clothes hanger graphics) and open shelves (shown by continuous lines). Varying the types of storage allows for the best, practical use of the space.
Notice the short walls leading into the closet. They were included as place to locate light switches.
In the plan below, notice the improved circulations. The new closet layout provides enough room for two people to use the space at once, and better allows for the closet to be sub-divided between users so there is a clear demarkation of storage areas.
MASTER BATHROOM + CLOSET FLOOR PLAN
MASTER CLOSET FLOOR PLAN
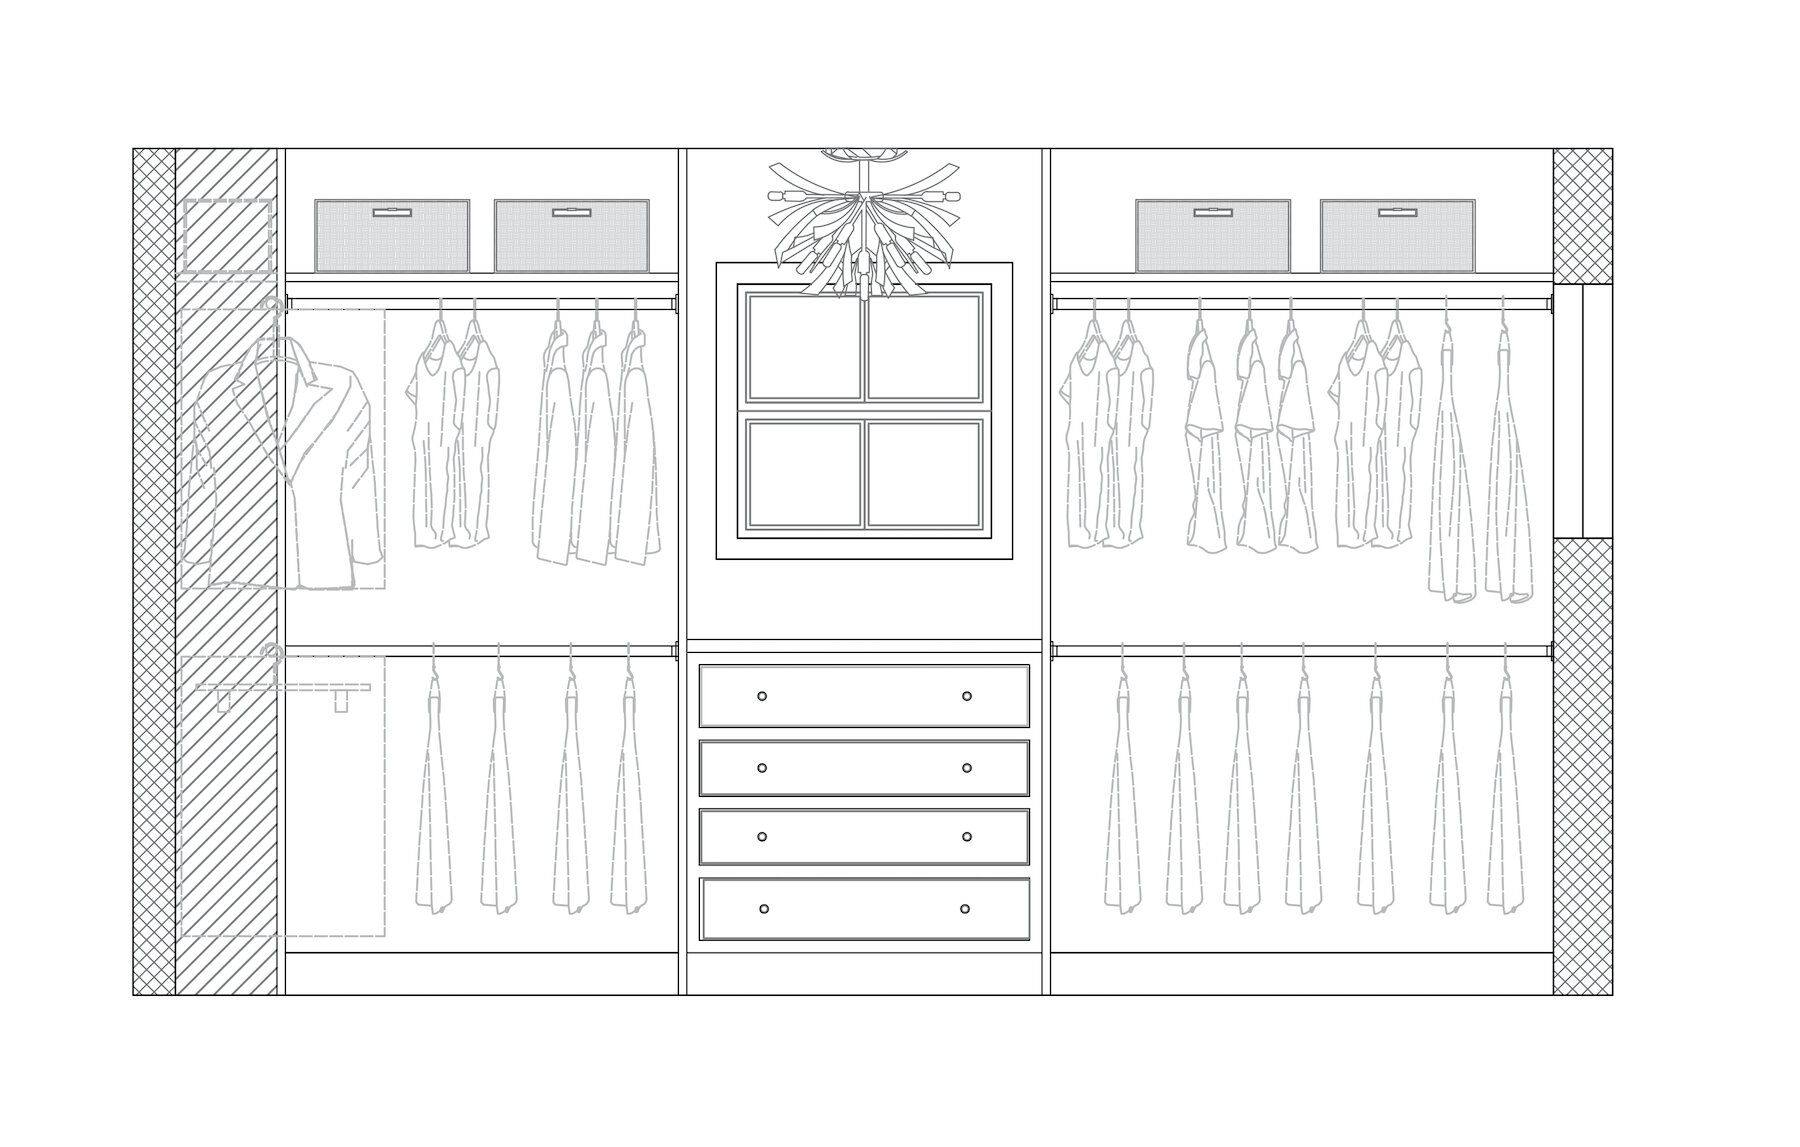
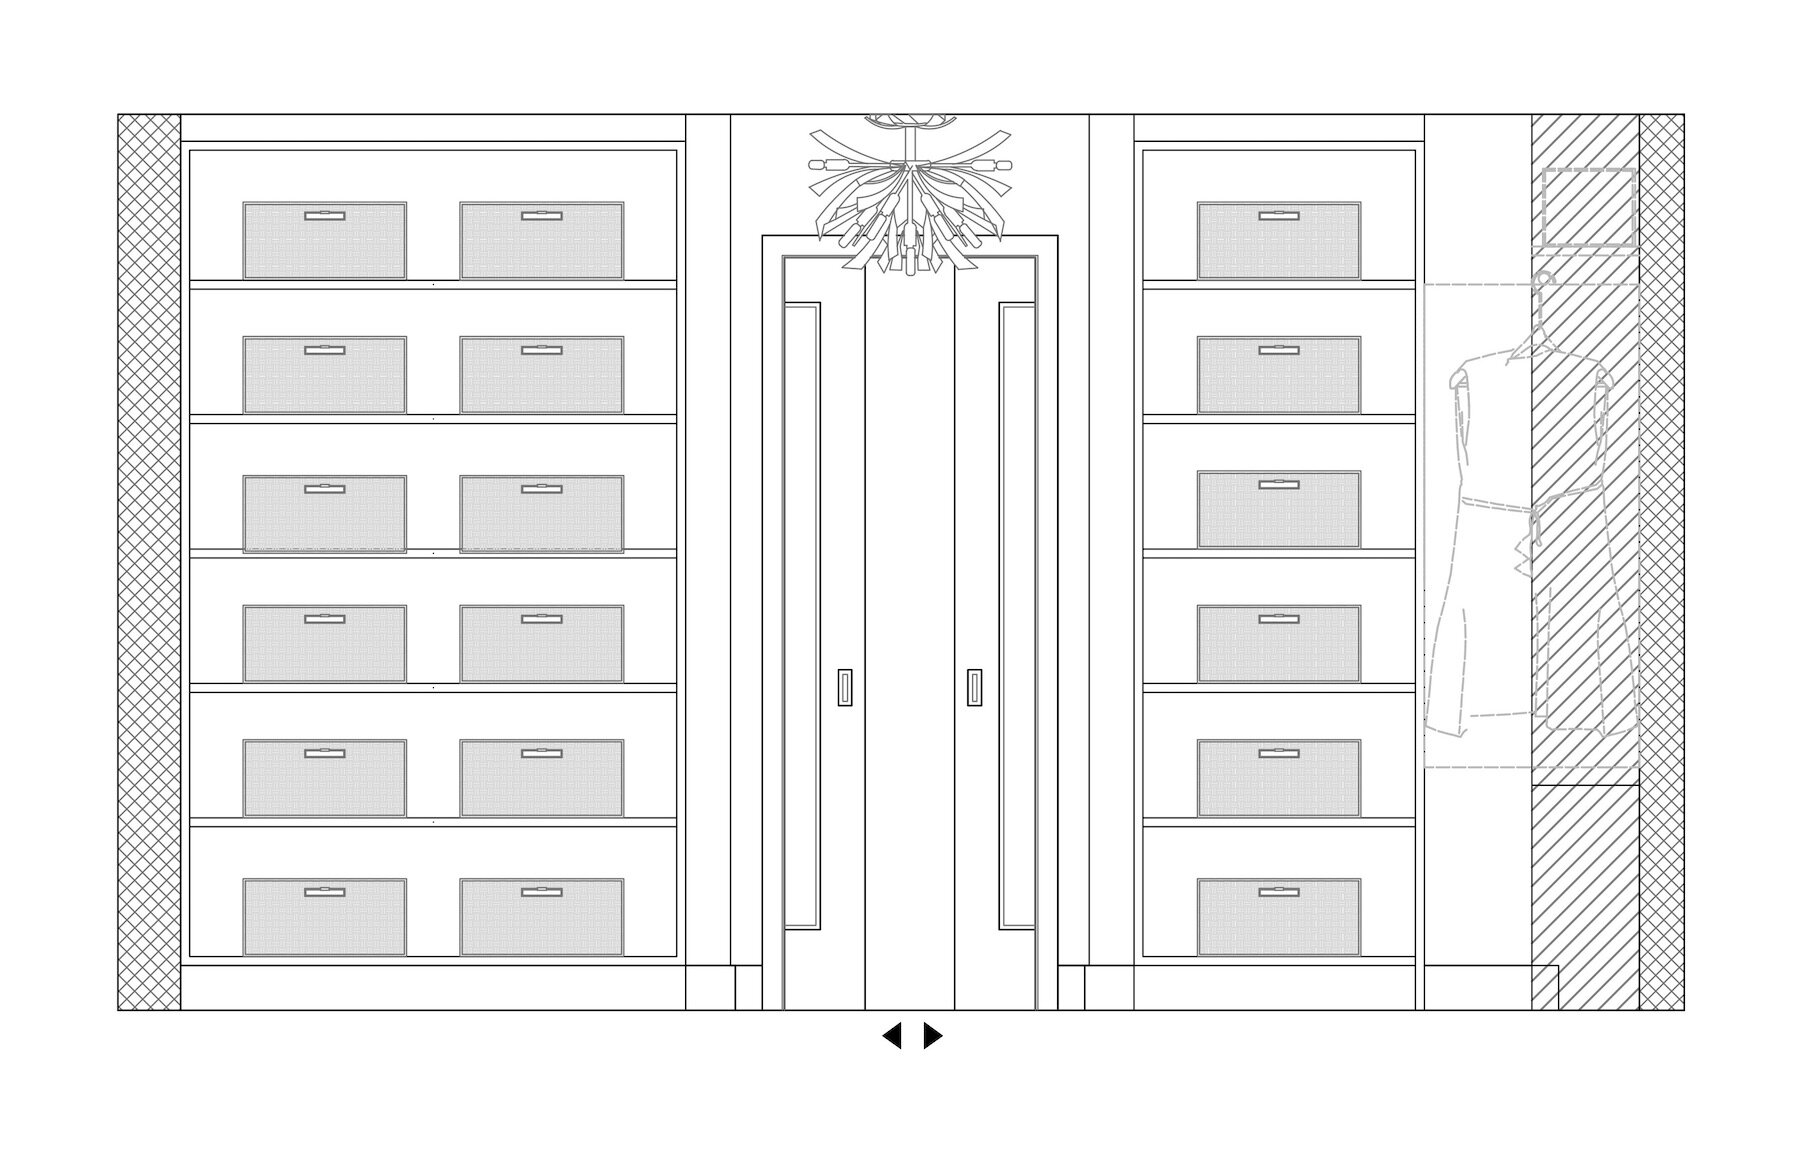
MASTER BATHROOM CLOSET ELEVATION
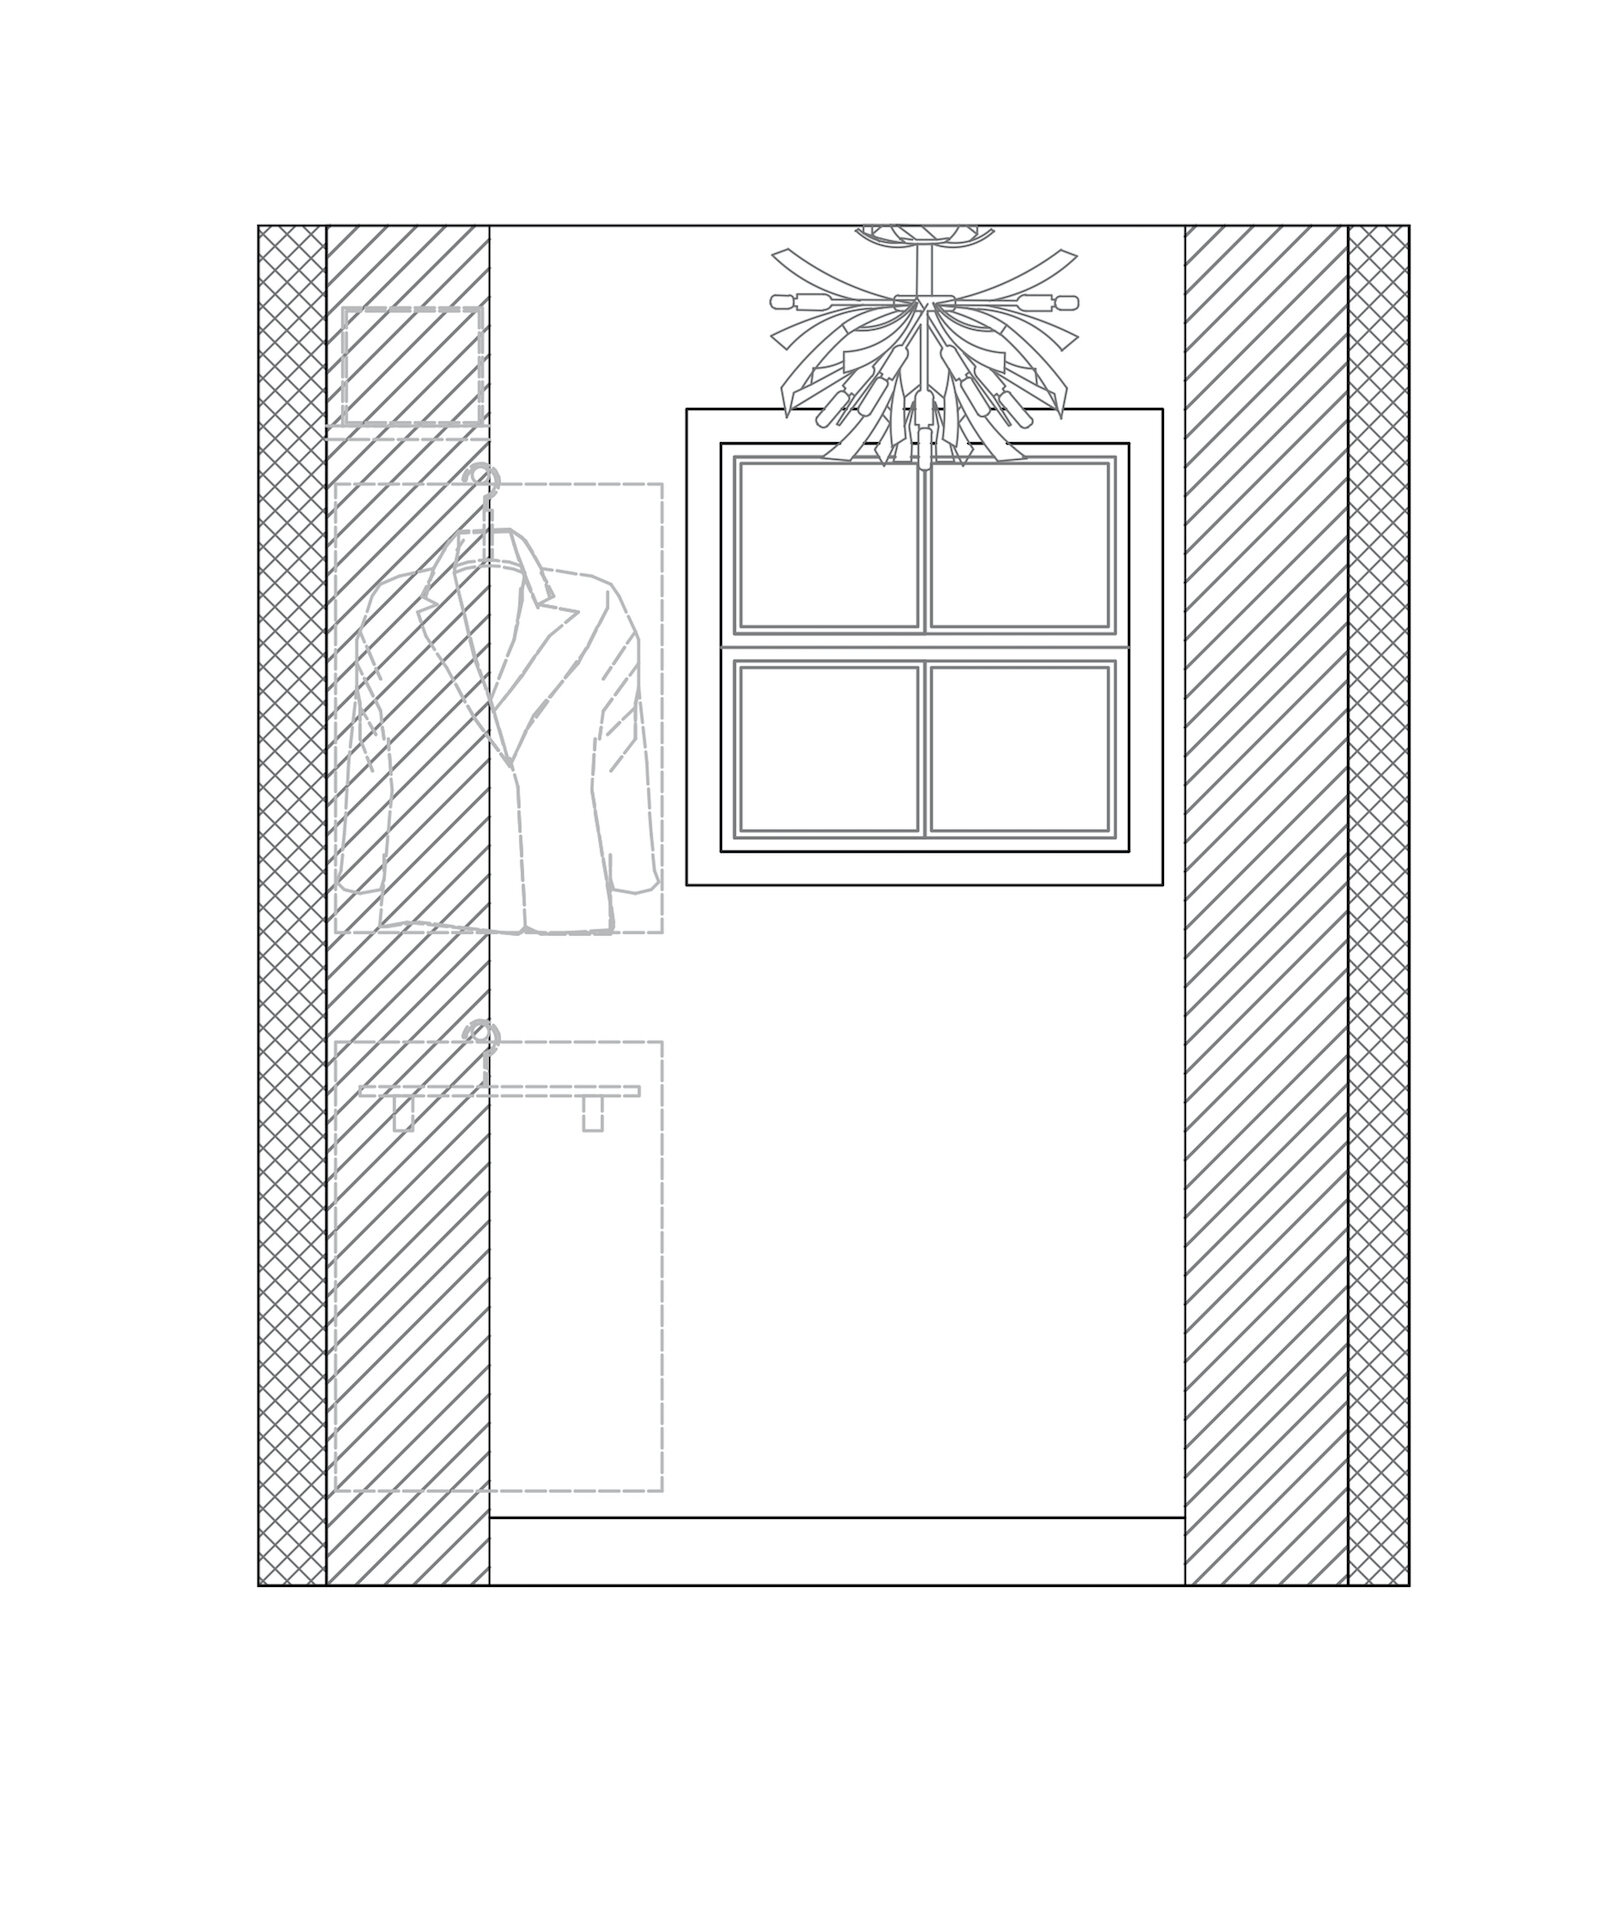
Although one of my concerns with the original design was that it lacked a door, notice the new-line-of-sight between the bathroom and closet in the perfected floor plan. What would have been uninspired and messy, now includes what will be a beautifully view, framed by the doorway, showcasing a window overlooking a side yard with mature trees, an interesting flush-mount light and built-in dresser.
Take note of how we included a side panel between the hanging clothes and the window and dresser. This was done to securely hold the cloths away from the window, while preventing them from potentially interfering with it.
I have a hunch that with this new and improved plan that the closet doors will often remain open, providing a lovely framed view between the rooms and an increased since of space.
Along with the built-in dresser, we also included a few low drawers to better utilize the space below the hanging rods that were included for long garments. Notice too, how we included hanging rods for short garments as well.
The open shelves can be used for shoe storage, basket storage or even for stacks of folded garments like jeans, places to stack accessories like purses, bags and hats, etc.
MASTER BATHROOM CLOSET ELEVATION
MASTER BATHROOM CLOSET ELEVATION
MASTER BATHROOM CLOSET ELEVATION
MASTER BATHROOM CLOSET ELEVATION
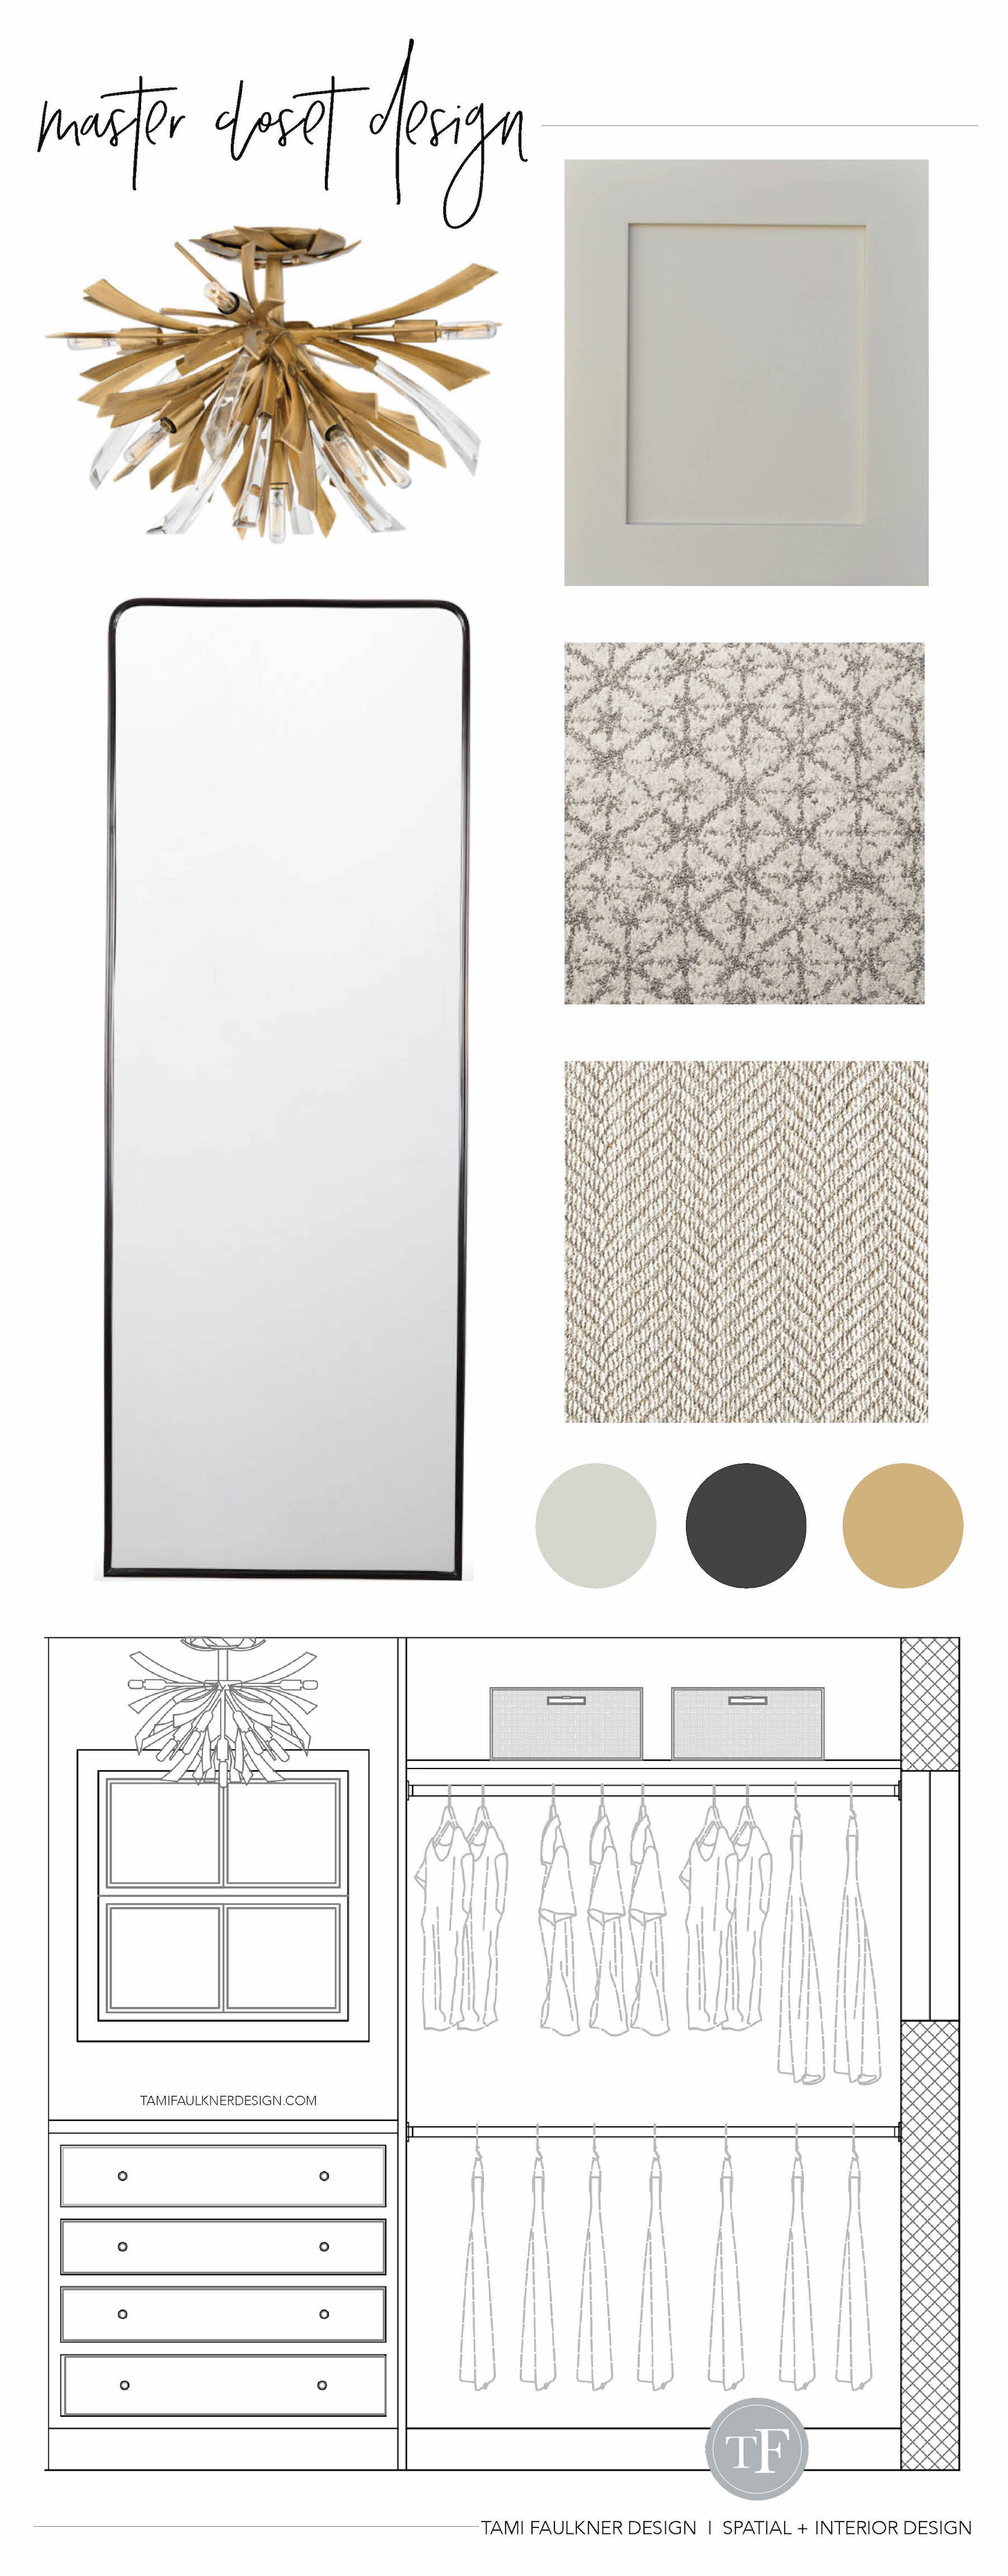
MASTER BEDROOM CLOSET PRELIMINARY COLORS AND MATERIALS
THE TAKE AWAY
In all of our floor plans, even the preliminary ones we always include furniture layouts and design graphics representing the cabinets and closet designs, etc. Not only does this help the clients better visualize the space, but also more accurately depicts how the space would live and function. Additionally, the graphics inform our designs and keeps us focused on things like proper circulation, focal points, locations of light switches, etc. Before moving forward with a floor plan, take the care to hire a skilled designer that will include these types of details. It will make all the difference in the success of your project.
Let's circle back to designing space for dual users. A space designed for the use of one person is going to be handled differently than a space that requires the ability for two people to comfortably use it at once, even more so if the space is relatively small. It will take a skilled and seasoned designer that specializes in interior architecture to offer the best solutions for function and utility. The Melodic Landing Project master suite (same is true with the perfected floor plan of the entire house - which I'll continue to share in part) is a nice example of modeling space to get the best outcome based on the activities that will take place and the amount of people expected to use the space at once.
At the risk of sounding like a broken record, let me once again bring home the point about the critical role elevations play in both the design and construction phase of projects. Like always, when designing the floor plans for this space we went back and forth between the floor plans and elevations, carefully and thoughtfully making sure that the floor plan would translate well in the vertical view. For example, the final location of the exact windows was determined by making sure that we had ample amount of space between the clothes storage and the window trims. It would be very difficult to achieve that kind of precision in design without making adjustments to the final floor plan in tandem with the design of the elevations.
To see the accompanying SPACE PLANNING TUTORIAL .04 - MELODIC LANDING MASTER CLOSET DESIGN, go to IGTV on my Instagram profile.
TF DESIGN
If you appreciate the level of design we do at TF Designand have a new build or remodel project in your future, be sure to reach out. I can help assure that you get the most out of your space no matter the size, no matter how awkwardly designed the as-built floor plan is, or no matter how challenging. I can solve your spatial challenges.
Same thing goes with new builds - we can start a floor plan from scratch, or I can help improve and fine-tune the ones you have.
Would you like TF Design to review and provide redlining for your new build project?
Let's work together to make your home the best it can be.